

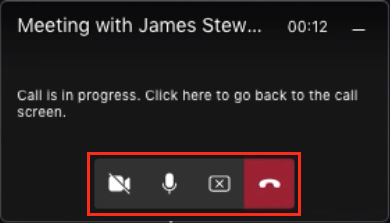
Try Process AI free
How to share documents on microsoft teams meetings.
Microsoft Teams is a great tool for teams to communicate and work together. It has the ability to share documents during meetings, enabling participants to view, edit, and collaborate on files in real-time.
Shared documents in Microsoft Teams meetings are essential for effective communication and collaboration. Everyone can have the same understanding of topics discussed, avoiding any confusion. Presentations, reports, or any other document relevant to the meeting can be shared to ensure everyone is on the same page.
To share documents on Microsoft Teams:
- Open the document such as PowerPoint, Excel, or Word.
- Join or start a meeting.
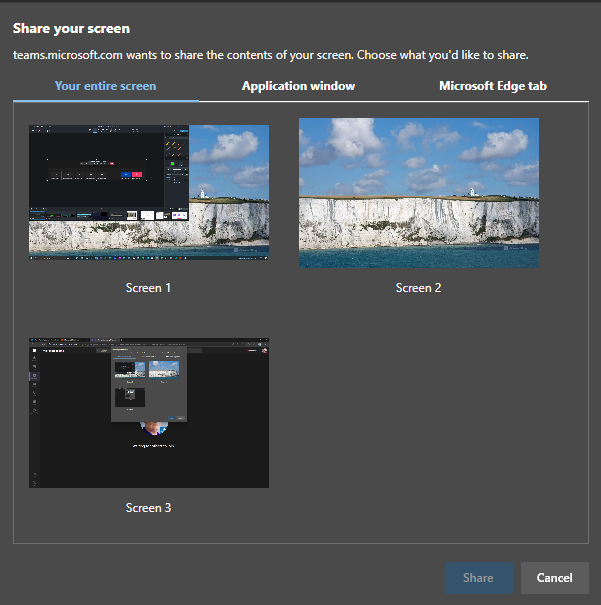
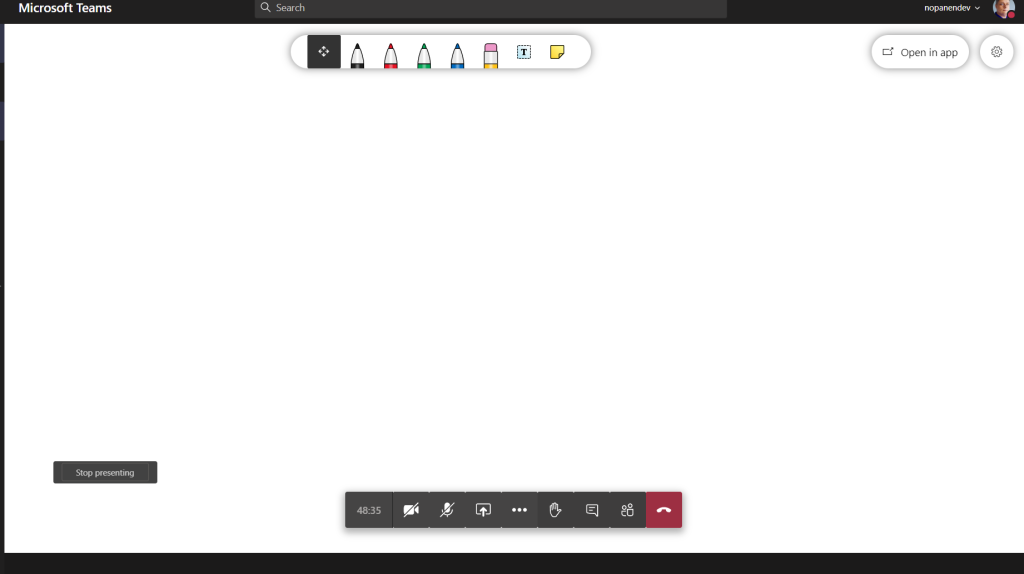
- Click ‘Share’ at the bottom of the screen.
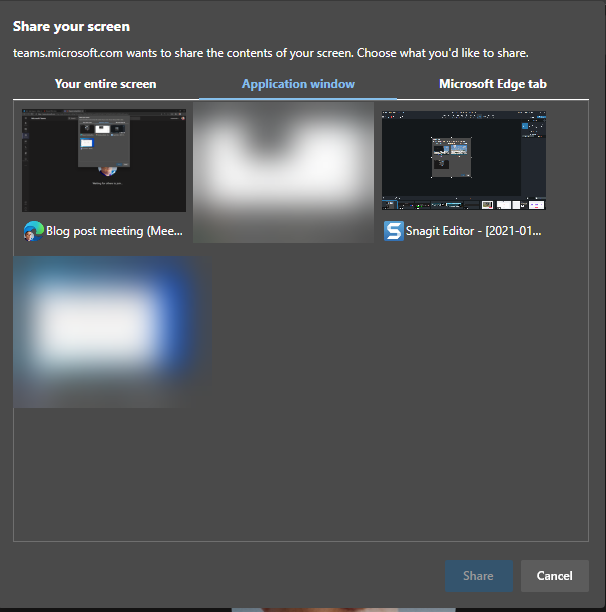
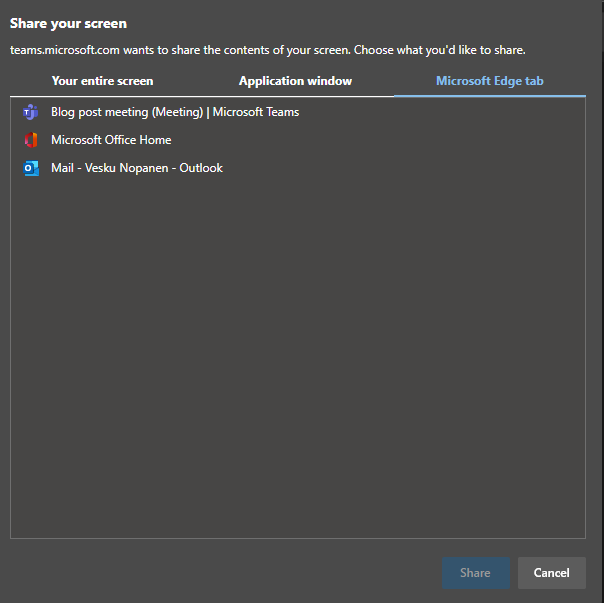
- Select ‘Desktop’ to share the entire screen or ‘Window’ to share a specific application window.
- Click ‘Share’ and the participants will see your document.
- Participants can interact with the content by editing or annotating it with built-in collaboration features.
Understanding Microsoft Teams Meetings
Understanding the Essence of Microsoft Teams Meetings
Microsoft Teams Meetings are an integral part of virtual collaboration, allowing users to connect and communicate seamlessly. These meetings facilitate real-time interactions, enabling participants to share information, exchange ideas, and collaborate effectively.
| Participants: |
|---|
| Number of Participants: 20 |
| Average Meeting Duration: 1 hour |
| Average Attendee Engagement: 80% |
| Meeting Schedule: 10 AM – 12 PM |
Microsoft Teams Meetings provide a range of unique features such as screen sharing, chat options, and document sharing, fostering a dynamic and engaging meeting atmosphere. By utilizing these functionalities, participants can easily share documents, presentations, and other relevant materials, enhancing the effectiveness of the meeting.
In addition to its versatile features, Microsoft Teams Meetings offer integration with other Microsoft applications, such as OneDrive and SharePoint. This integration streamlines the document sharing process by enabling participants to access and share files directly from these platforms, eliminating the need for complicated file transfers or attachments.
To fully leverage the potential of Microsoft Teams Meetings, it is crucial for participants to familiarize themselves with the various tools and features available. By exploring and utilizing these functionalities, users can maximize collaboration opportunities, optimize meeting outcomes, and enhance overall productivity.
Don’t miss out on the valuable benefits Microsoft Teams Meetings provide. Take advantage of its dynamic features, seamless document sharing, and enhanced collaboration opportunities to make the most of your virtual meetings. Join the millions of users already benefiting from Microsoft Teams Meetings and elevate your virtual collaboration experience today.
Microsoft Teams Meetings: Where virtual chaos reigns and document sharing becomes an extreme sport.
Overview of Microsoft Teams Meetings
Microsoft Teams Meetings are a great way for teams to connect and collaborate remotely. With its many features, it ensures smooth communication while working from home.
- Teams Meetings let you join with a single click – no lengthy set up needed.
- It has video calls, so you can see each other even if you’re far apart.
- Screen sharing helps you present your ideas, encouraging team discussions.
- The chat feature keeps communication flowing with real-time messaging and sharing.
Plus, it has special functions like breakout rooms for small groups and live events for big presentations.
Don’t miss out on the opportunity to communicate and collaborate easily. Try Microsoft Teams Meetings and experience better productivity and teamwork. Start using this powerful tool today!
Benefits of using Microsoft Teams Meetings for document sharing
Microsoft Teams Meetings makes document sharing easy and efficient! Its powerful features have many advantages that boost collaboration and productivity. Such as:
- Seamless Collaboration : Share documents with colleagues in real-time – no need for multiple emails or file transfers.
- Version Control : Keep track of document versions, so everyone works on the right one.
- Enhanced Security : Microsoft Teams Meetings prioritizes security with permissions control and encryption.
- Accessible Anytime, Anywhere : Documents can be accessed from any device with an internet connection, so remote collaboration is convenient.
Plus, it offers screen sharing and integrated chat. It’s perfect for communication and collaboration!
John , a marketing exec, had to share an important presentation with his team. With Microsoft Teams Meetings, he quickly shared the PowerPoint document. He could also conduct a virtual meeting! This made the project successful, saving time and allowing instant feedback.
Step-by-Step Guide to Sharing Documents on Microsoft Teams Meetings
Microsoft Teams Meetings: A Professional Guide to Document Sharing
Sharing documents during Microsoft Teams Meetings can enhance collaboration and streamline communication. Follow these steps for a seamless sharing experience.
- Open the Microsoft Teams app and join or start the meeting.
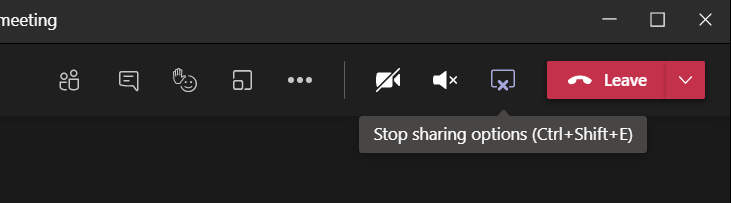
- Locate the toolbar at the bottom of the screen and click on the ‘Share’ button.
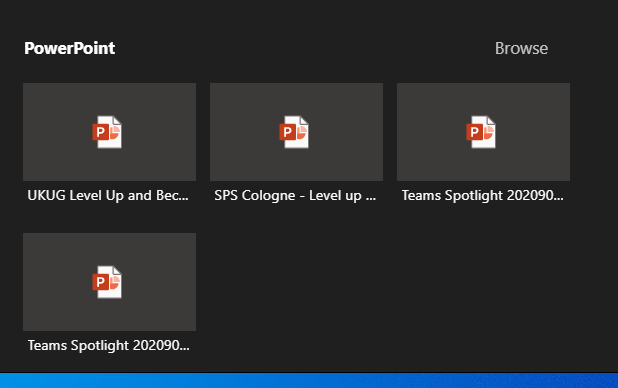
- A pop-up window will appear with various sharing options. Choose the ‘Browse’ option to select the document you want to share.
- Once you’ve selected the document, click on the ‘Share’ button to initiate the sharing process.
- The document will now be displayed to all meeting participants. You can navigate through the document using the available controls.
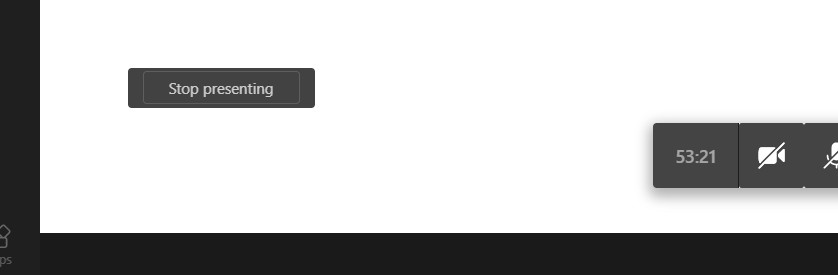
- To stop sharing the document, simply click on the ‘Stop Sharing’ button on the toolbar.
These steps provide a comprehensive guide to sharing documents on Microsoft Teams Meetings, ensuring effective collaboration and increased productivity.
Moreover, sharing documents in real-time allows all participants to work on the same document simultaneously, promoting a truly collaborative environment.
Fact: Microsoft Teams is used by over 115 million daily active users worldwide. (Source: Microsoft)
Get your documents in order, because in the chaotic realm of Microsoft Teams meetings, even paper clips have trust issues.
Preparing your documents for sharing
- Organize docs: Before the meeting, spend time organizing docs logically. Create folders or labels for different types of files, like presentations, spreadsheets, or PDFs. This will help you find and share the right doc during the meeting.
- Check compatibility: Check if the files you plan to share are compatible with Microsoft Teams Meetings. See if file formats are supported and if any specific software or plugins are needed to view or edit them. This will prevent tech difficulties during the meeting.
- Review settings: Before sharing, review document settings to determine what access others should have. Choose if participants can just view, or if they should be allowed to edit or comment. Adjusting these settings beforehand will save time and avoid unauthorized changes during the meeting.
- Also consider internet connectivity and permissions for file sharing within Microsoft Teams Meetings.
Follow these steps when preparing docs for Microsoft Teams Meetings. Maximize productivity and enhance collaboration in meetings by implementing these steps today! Impress others with seamless document sharing experiences on Microsoft Teams Meetings!
Starting a meeting and accessing the document sharing feature
- Schedule or join a meeting: Get started by scheduling or joining a Microsoft Teams Meeting . You can create a new one or select an existing one from your calendar.
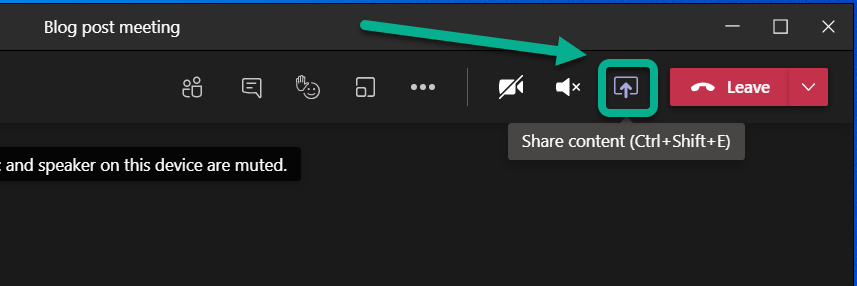
- Access the document sharing feature: Locate the toolbar at the bottom of the screen. Look for the “Share” button, which is the arrow pointing up. Click it to access the document sharing feature.
- Share your documents: After you click the “Share” button, a window will appear with various options for document sharing. Select whether you want to share your whole screen, a certain application window, or upload files from your computer. Follow the instructions to share your documents.
Extra info:
- Collaborative editing: Collaborate in real-time by making changes/providing feedback while sharing documents.
- Annotation tools: Highlight important sections, draw shapes, or add text to shared docs.
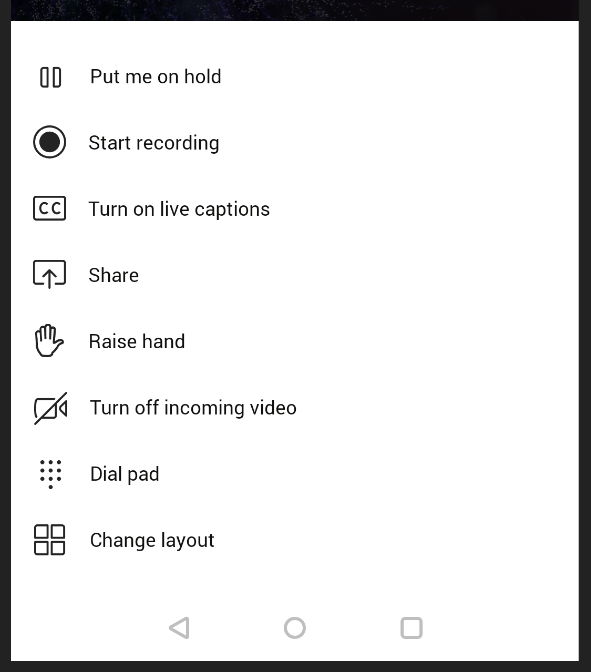
- Live captions: Enable live captions for better accessibility during meetings. Real-time transcription of spoken words.
Pro Tip: Before you start the meeting, ensure that all participants have access privileges for the files. A good collaboration experience depends on everyone’s ability to view and edit documents in Microsoft Teams Meetings.
Uploading and sharing documents during a meeting
Sharing documents on Microsoft Teams during meetings is super easy! Just go to the sharing tab and pick the file you want to share. It could be from your computer or services like OneDrive or SharePoint . Then the document will instantly be uploaded for everyone to view. Plus, you can give specific permissions and control who can edit the document. You can even highlight, draw, and comment directly on it.
Did you know? 85% of businesses use Microsoft Teams as their main communication platform for remote work!
Controlling document sharing settings
- Open the Microsoft Teams app on your device.
- Schedule or join a meeting and share docs.
- Locate the toolbar at the bottom of the screen.
- Click the ‘Share’ button: this is an icon of a square with an arrow pointing up.
- Choose to share your screen, a window, or just a PowerPoint.
These steps let you control document sharing settings and make sure only relevant content is shared during the meeting. However, there are extra things to note. In the sharing options, you can also select whether audio is enabled when sharing docs. This ensures clear communication without distractions.
For effective document sharing, here are some tips:
- Prioritize security – limit document sharing to specific people or groups who need access.
- Be organized – create folders or categories for various documents in your shared drive.
- Keep documents updated – make sure all docs are up-to-date before each meeting.
- Provide instructions – give instructions on how to navigate or interact with a doc during a meeting.
By following these tips, document sharing in Microsoft Teams meetings will be enhanced and team productivity increased. Check and adjust settings regularly based on the needs of the meeting or project.
Troubleshooting Tips
Troubleshooting Tips:
To resolve any issues that may arise during your Microsoft Teams meeting, follow these tips:
- Check your internet connection: Ensure you have a stable internet connection to avoid any interruptions while sharing documents.
- Update your Microsoft Teams app: Make sure you are using the latest version of the Microsoft Teams app to access all the available features and bug fixes.
- Restart your device: If you encounter any technical glitches while sharing documents, try restarting your device as it can often resolve minor issues.
- Clear cache and temporary files: Clearing your cache and temporary files can free up resources and improve the performance of the Microsoft Teams app.
For any other specific troubleshooting needs, consult the Microsoft Teams support documentation or reach out to their customer support team.
If you want to have a seamless experience during your Microsoft Teams meeting, it is vital to troubleshoot any potential issues beforehand. By following these tips, you can ensure a smooth document sharing experience and avoid any potential disruptions. Don’t miss out on the opportunity to make your meetings more productive and efficient by resolving any technical difficulties that may arise.
Stepping into a Microsoft Teams meeting? Brace yourself for common document sharing issues and learn how to resolve them like a pro.
Common issues and how to resolve them
Software crashes or freezes? Make sure your software is up-to-date and compatible with your OS. Also, do a clean boot and disable any unnecessary startup programs.
Printer malfunctions? Check for paper jams, low ink levels, and ensure the printer drivers are correctly installed. Restart your computer and printer to resolve any software issues.
Unresponsive keyboard or mouse? Check for any loose connections and replace the batteries if necessary. If that doesn’t work, update or reinstall the drivers.
Troubleshooting needs patience and diligence. To fix your issue, consider these tips and take appropriate steps.
Early days of computers saw numerous technical glitches due to limited hardware capabilities. Users had to manually troubleshoot with complex manuals. But, with tech advancements and user-friendly interfaces, troubleshooting has become much easier for all users.
Tips for optimizing document sharing experience
To make document sharing a breeze, here are some tricks!
- Ensure the document is in a compatible format such as PDF or Microsoft Office.
- Compress large files for quicker sharing and storage savings.
- Password-protect sensitive docs to keep private info secure.
- Be mindful of file permissions when using cloud services like Google Drive or Dropbox.
- Verify shared docs before sending to avoid costly mistakes.
These tips can help us sail through document sharing without a hitch!
Microsoft Teams makes document sharing during meetings a breeze. Just hit the “Share” button on the toolbar and select the file you want to share. Click “Share” again and you’re ready to go!
Also, you can show applications or even your whole screen. Plus, with annotation tools, everyone can mark important sections and comment on shared docs. This level of collaboration keeps everyone in sync and saves precious time.
Sarah, a project manager, had a great experience with Teams. When one of her team members didn’t have access to a doc, she quickly shared it using Microsoft Teams. No emailing or other methods – it was fast & easy!

No credit card required
Your projects are processes, Take control of them today.
Vesa Nopanen – My Metaverse Day
Mr. Metaverse welcomes you to my Metaverse day to explore the Future Work.
The Ultimate How To Guide for Presenting Content in Microsoft Teams

Sharing / presenting content in Teams meeting is at the same time simple but is also has some options available that may not be known enough by everyone. This guide lets you get started and dive deeper what happens when you share your window, document or desktop in Microsoft Teams.
This article will be updated when there are new features or based on feedback.
Updated 22.3.2021 Presenter View section.
Community: I am happy to add Mac and iOS screenshots into the article as well if someone is willing to collaborate & provide them. 😎💪
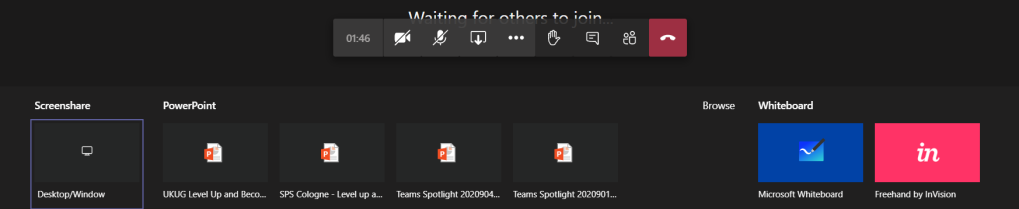
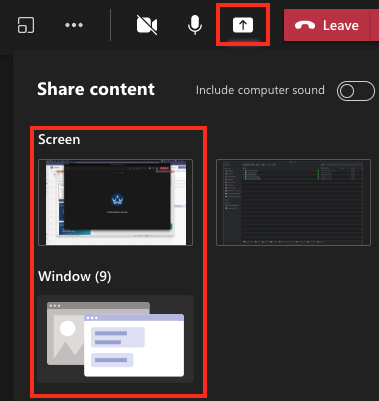
Teams Desktop: sharing a screen (Windows)
Opening the sharing with Microsoft Teams Desktop (in the New Meeting experience mode).
This opens the Share Tray. From it you can choose to start sharing
- Your Desktop (Screen share)
- Specific application (Window)
- Whiteboard application: either Microsoft Whiteboard (natively with Microsoft 365) or available 3rd party Whiteboards
- PowerPoint document
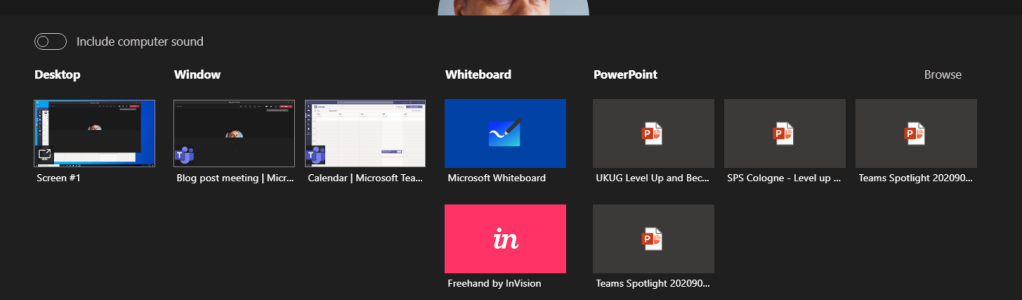
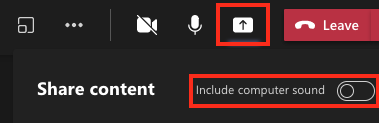
TIP: When you choose to share something using Teams Desktop you can choose to include your computer sounds to meeting. This is a must-have option if you are playing music or video to your participants. You can not toggle this on later – you need to choose this when you start sharing.
When you choose to include computer sound included with the sharing you need to have configured the speaker for computer and Teams meeting to be the same one.
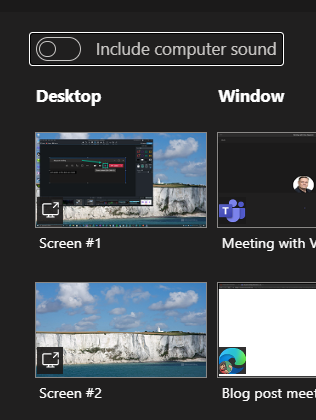
If you have multiple monitors available for your Microsoft Teams you can choose any of those displays.
And you have the sharing open. Shared area is marked with red rectangle around it. You will find the more smaller Teams meeting control window in one of your desktops – and if you have the camera on it will show the video.
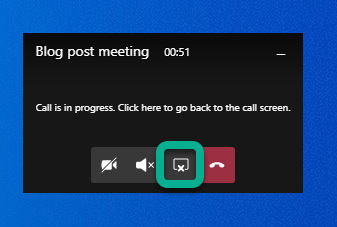
But more importantly you can use that small window to control camera, audio or sharing (ending it with one press). Or you can click on the small window (not on meeting toolbar) and it will expand back to the full size.

You can use that same icon to stop sharing in the expanded window.
Tip: If you have two screens available you should consider presenting your PowerPoint presentation so that you share the external screen and project your presentation there (PowerPoint – Slide Show – Monitor). Share that external screen to Teams meeting so you can be sure that whatever you show in that screen it is shown to attendees. Just check that your second screen is not a ultra-wide display or 8k (or preferably even 4k) because the content is going to be tough to read and view by attendees. FullHD screen works the best here.
Tip2: when you are presenting PowerPoint in external screen (and sharing that to Teams meeting) do they advantage of inking and pen if you are using a device with touch screen (like Surface)!
Tip3: if you have an embedded video in your PowerPoint and you use screen/display sharing to present it to the audience: Don’t forget include computer sound with your share!
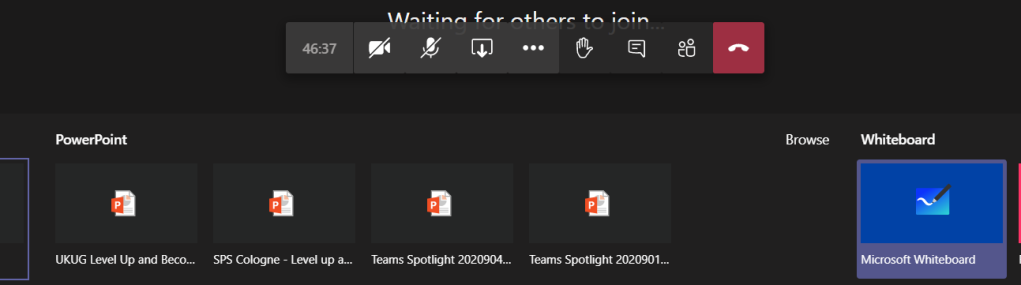
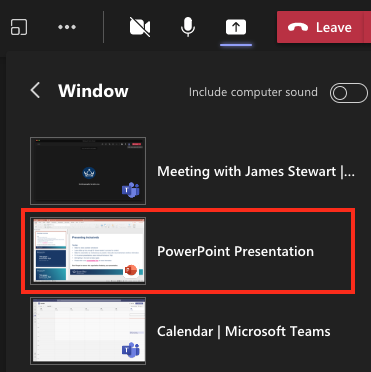
Teams Desktop: sharing a PowerPoint
You can choose from your recent PowerPoint documents in the list
- A PowerPoint document you opened or edited in Microsoft Teams (in a team you belong to) or in your OneDrive
- Browse for more
This list of sharing PowerPoints is causing often some big questions. PowerPoints will appear in the list once you edit or open the PowerPoint presentation in Teams or OneDrive (there may be some short delay). Generally it applies to the next meeting you join. Make sure you prepare for the meeting by opening the document in advance. Simply uploading a presentation to OneDrive or Teams does not bring it to the list – you need to open/edit it as well.
Browse-option lets you choose a PowerPoint from your OneDrive or from your computer.

What this one lacks is the ability to choose a file from a team you belong to.
TIP: Use OneDrive syncing to have an easy access to files in the most relevant teams you belong to .
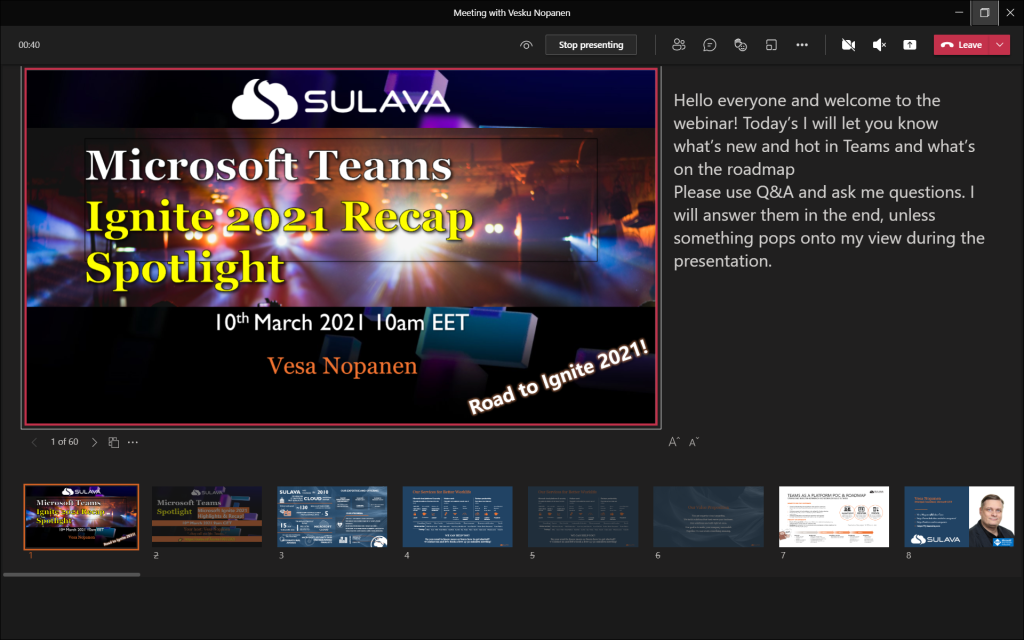
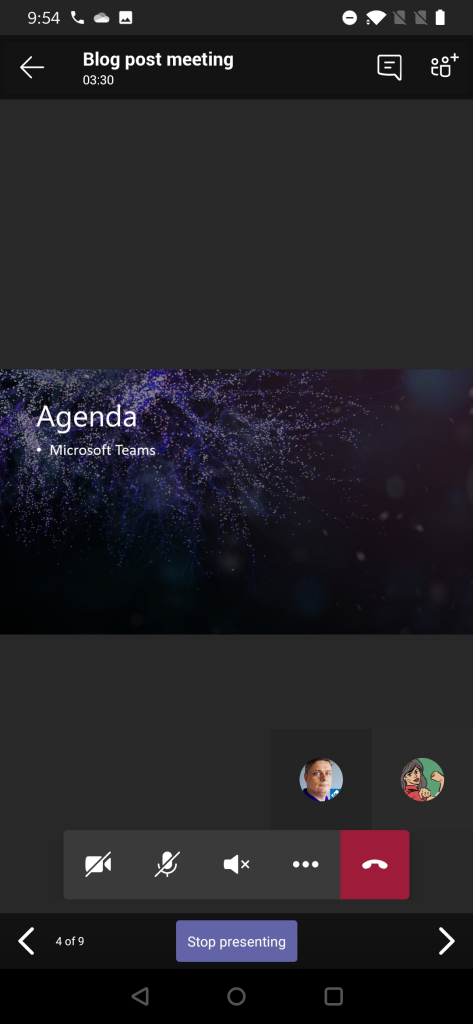
Once you are sharing the PowerPoint you can see it in the presenter view mode! This feature is generally available ! This makes it easy to do presentations using Teams – without having to have a PowerPoint desktop app open at the same time. Seems to work only on Teams Desktop with new meeting experience mode at the moment.
The presented area (PowerPoint) is shown surrounded with a red rectangle.
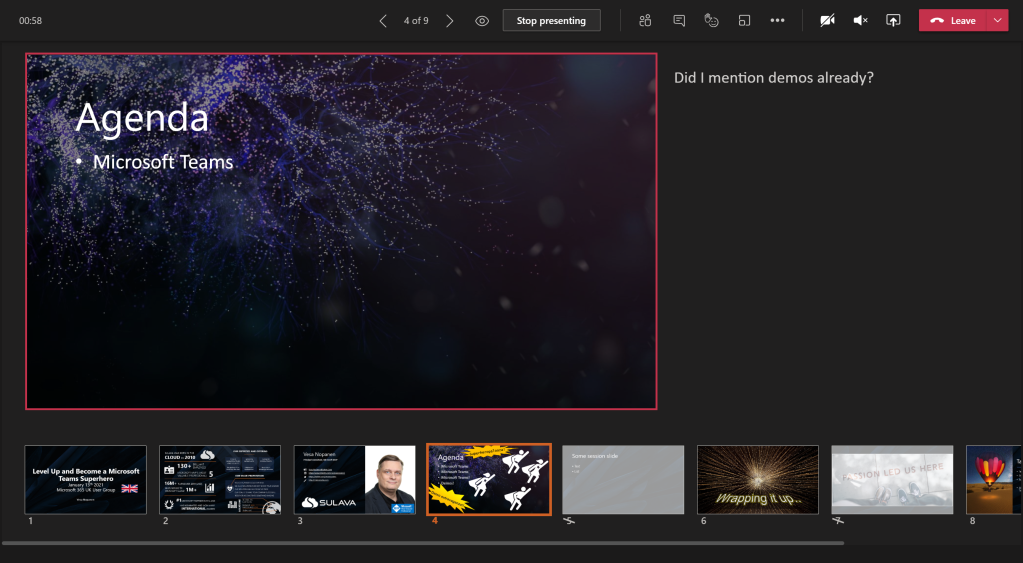
Updated 22.3.2021. There are other controls in this as well for jumping between slides and accessibility controls.
I have a another article diving deeper to Presenter view in here !
NEW: PowerPoint Live has now laser pointer and inking capabilities. Read about them here !
Once the presentation is shared you can move back and forth easily with arrows in the screen.

Note: there is the “eye” icon. If you press that one it locks the PowerPoint for the participants so that they see the same slide as you do: they can not browse the deck on their own. This is called private viewing disable (arrows for other participants will be disabled). Private viewing is enabled on default.

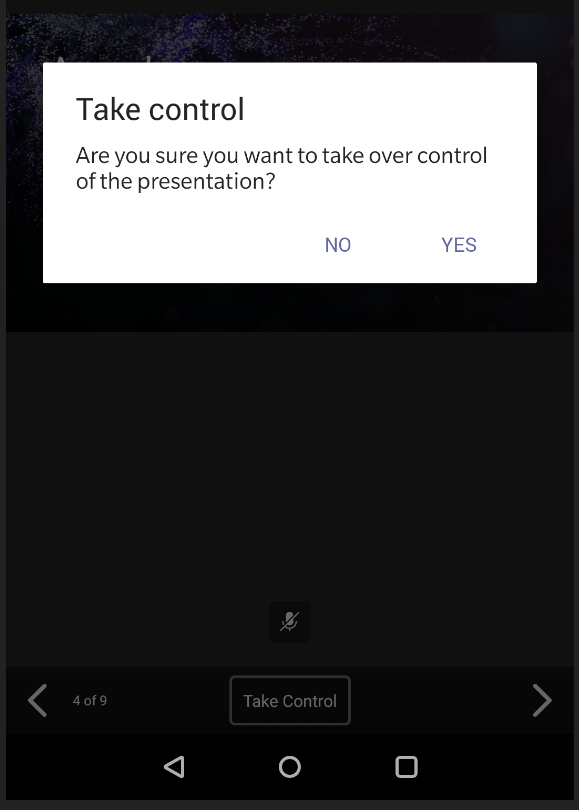
Note: if you are a presenter in the meeting where a PowerPoint is shared to you can take control of the shared PowerPoint to advance slides. This does not ask for any confirmation and the feature is really useful when you have multiple presenters who use the same slide deck. Just be careful that everyone else are not presenters – or they know not to touch it.

You will get a warning that someone has taken the control and can easily take it back.

Whoever is in control of the presentation has also the control to disable/enable private viewing mode. As can be seen in the picture above (with Take control) the eye is missing and arrows are greyed out: this means someone else than you have the control and they have disable the private viewing.
Note: When you share PowerPoint to a meeting this way participants can click links you have in your presentation. Thank you Joe for this reminder!

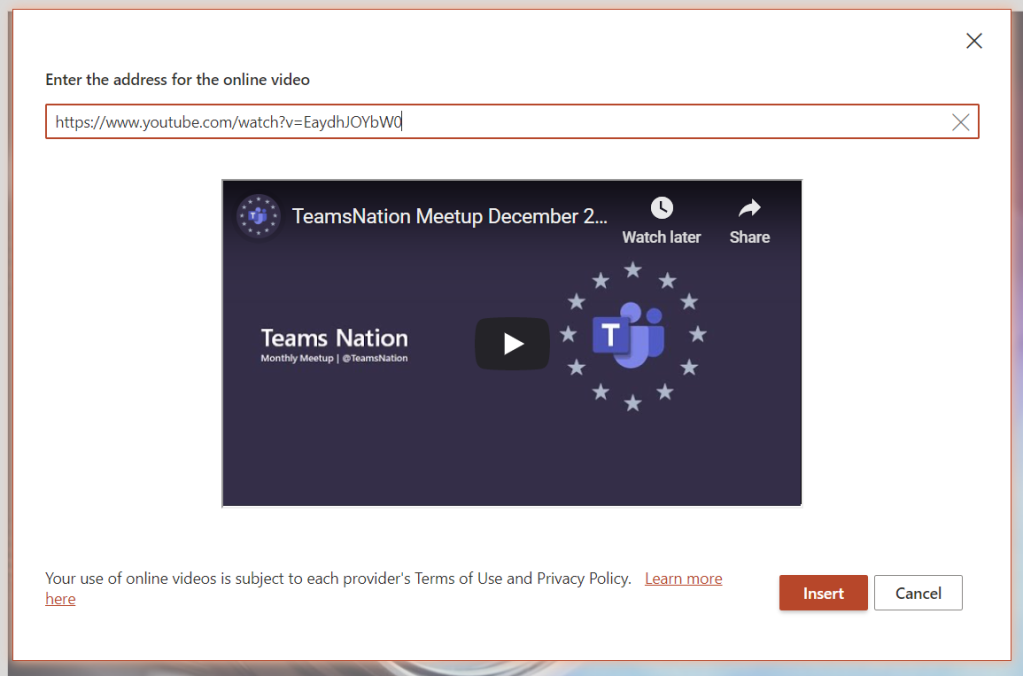
If you add a online video to your presentation your participants can activate that on their own as well. It is good also to note that if you hit “play” it doesn’t reflect to attendees (=they need to play the video themselves)
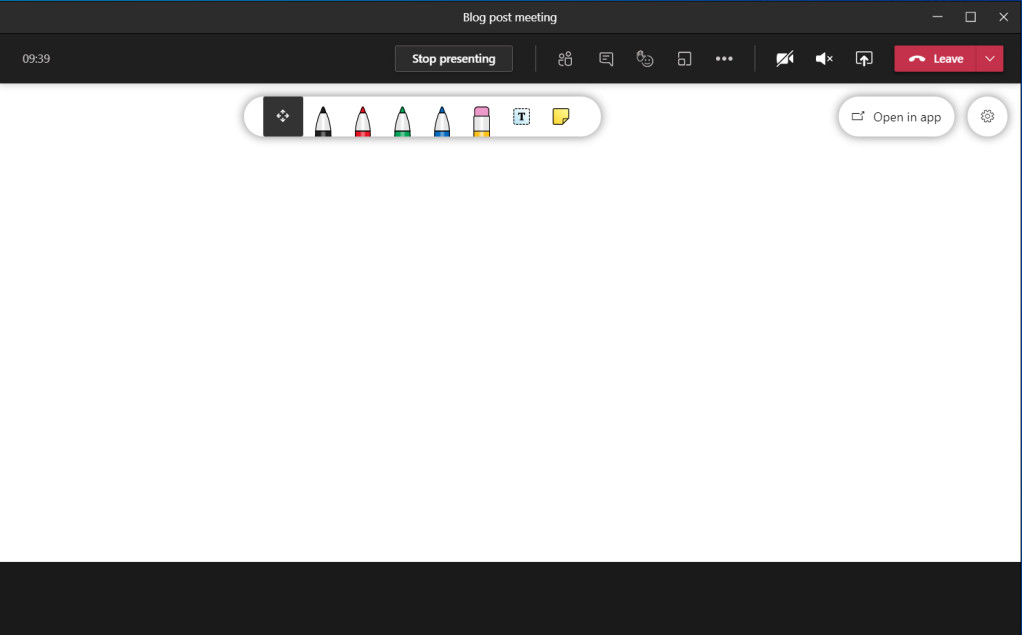
Teams Desktop: sharing a Whiteboard
When you choose Microsoft Whiteboard from the Share Tray you are taken directly to the Whiteboard view. Everyone who is in the same organization as you are (the situation in January 2021) can co-author the Whiteboard with you. Once you are done you can Stop presenting (middle top screen) or share something else.
Teams web client: sharing a screen (Microsoft Edge)
Sharing looks a bit different when you are using Teams web client. Sharing is available in (new) Microsoft Edge and Google Chrome browsers. The toolbar is hovering on top of the meeting. From the toolbar you can open the share tray.

When you have the share tray open you can choose to share something of following
- Desktop (Screenshare)
- A specific PowerPoint document
- Whiteboard: either Microsoft Whiteboard or Freehand (3rd party).
- Entire screen
- Application window (a specific application only)
- With Microsoft Edge you have option to choose a selected, specific, tab
When(if) you have multiple monitors it is easiest to just share a one of them: it makes the sharing really simple and easy to manage: anything on that display is shared.
If you don’t have multiple monitors then you might want to just share a single application.
This is useful when you want to show something specific that runs in it’s own application but you can not share anything else on your screen.
Note: Teams is not in the list (not even on blurred ones) and nor is Spotify or ToDo. Not every application can be shared with this.
Note2: you can not share desktop audio to the meeting using Teams web client.
And the last option is to share a selected Edge tab – and if you have multiple Edge profiles open you can share from any of those by clicking the desired Edge active and choosing the tab.
In my example I chose to share one of my screens. You don’t get much feedback – you just click on the screen and hit Share. In one of your screens you will have this toolbar:

You can end sharing using either that toolbar or you can navigate to your web Teams meeting and choose Stop sharing from the toolbar there.

Teams web client: sharing a PowerPoint
This list of sharing PowerPoints is causing often some big questions. PowerPoint presentations will be in the list once you edit or open the PowerPoint presentation in Teams or OneDrive (there may be some short delay). Generally it applies to the next meeting you join. Make sure you prepare for the meeting by opening the document in advance. Simply uploading a presentation to OneDrive or Teams does not bring it to the list – you need to open/edit it as well.

Note: there is the “eye” icon. If you press that one it locks the PowerPoint for the participants so that they see the same slide as you do: they can not browse the deck on their own. This is called private viewing disable. Private viewing is enabled on default.

Whoever is in control of the presentation has also the control to disable/enable private viewing mode.
Teams web client: sharing a Whiteboard
Sharing a Whiteboard is initiated simply by choosing Microsoft Whiteboard (or Freehand or other available 3rd party application) from the share tray.
I have found out that sometimes when you start sharing Microsoft Whiteboard to the meeting using Teams web client it doesn’t do anything. The solution is to try again.
Once the Whiteboard opens you can work on it normally – or choose to open it in the Whiteboard app to have a broader set of tools available.
When you are done you can choose the “Stop presenting” that is hovering on the left bottom area (left of meeting toolbar).
Teams mobile: sharing a screen
Were you aware that you can also share content using your mobile device? I have examples and screenshots using a Android device but these also work with iOS – the user interface might be slightly different.
You initiate the sharing via … menu selection in the mobile to open the list of options
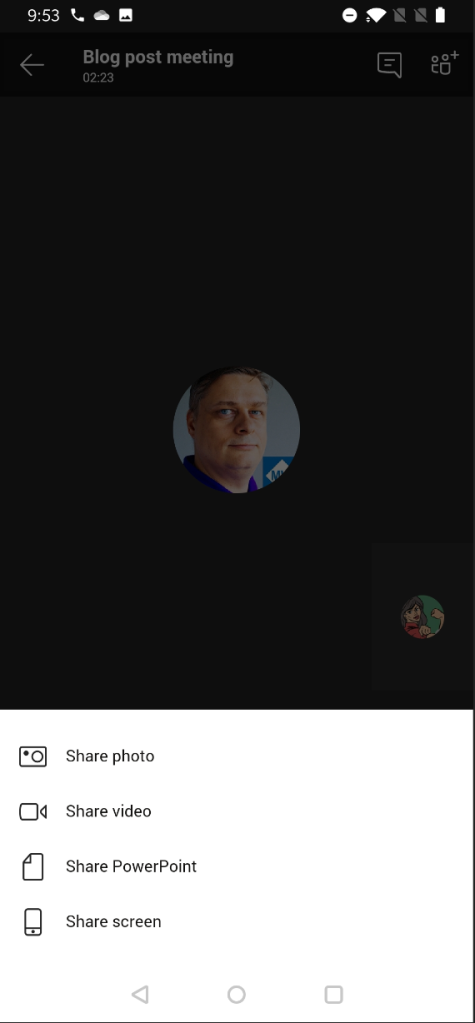
You choose Share and you get to choose what to share
Yes – you can share your mobile device screen to the meeting. This is really useful if you have a application you want to show or train to others.
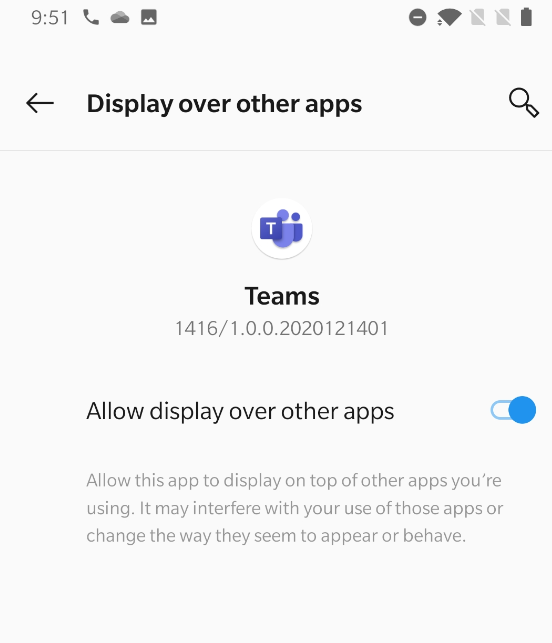
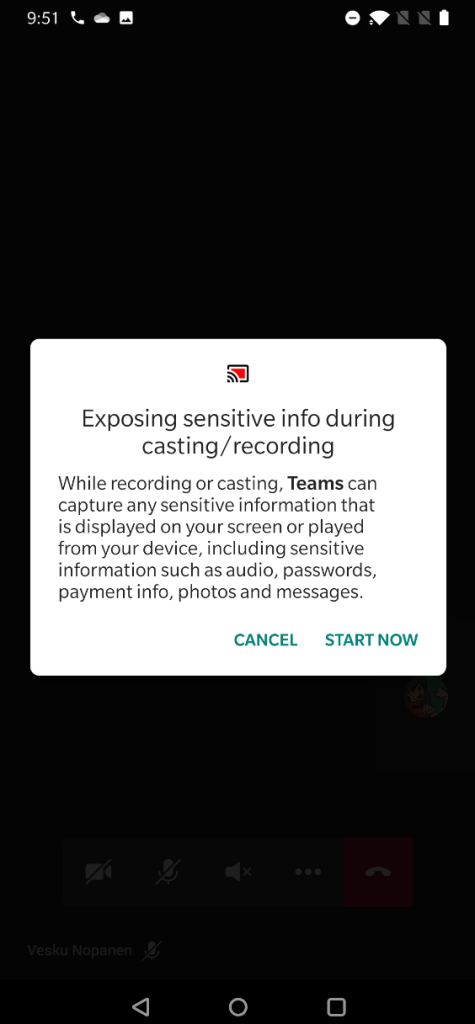
You may have to adjust settings to turn on allowing Teams to display over other apps.
After that one you may have reshare the screen. And you get the next warning.
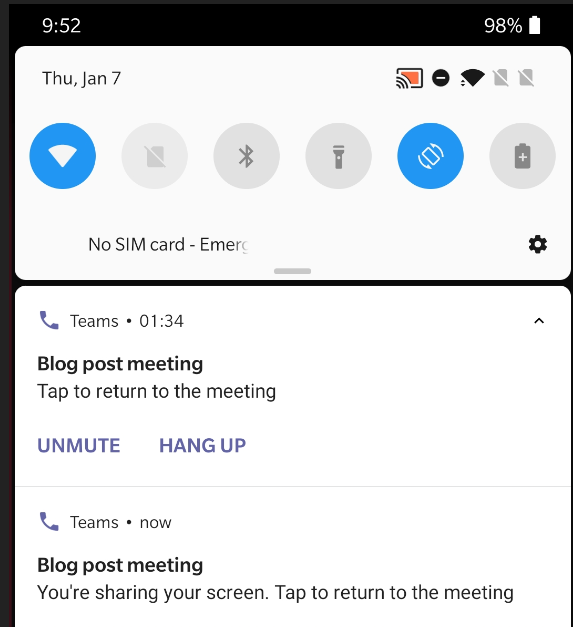
And your screen is now shared. You can see the red block that lets you know what are of your mobile device screen has been shared.

And if you pull down notifications area you have option to return to Teams meeting (if you have been using some other app) and there is also the notification that you are sharing your screen.
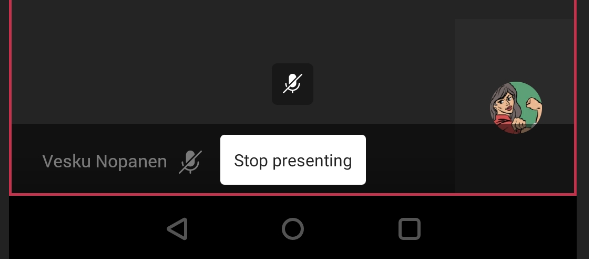
When you are done sharing you can return to Teams meeting and then choose to Stop presenting.
Teams mobile: sharing a PowerPoint
Sharing a PowerPoint works really well on Teams mobile! It is in fact even better than the version in other clients.
You start by imitating the sharing (as with screen share) and choosing the PowerPoint instead. You get a screen:
From this screen you can choose to browser thought
- A PowerPoint presentation from any Team and channel you belong to!
- Choose a PowerPoint presentation you opened or edited most recently (as you notice compared to other examples that this isn’t 1:1 in sync.. There are differences so that is why I am really happy that you can browse through Teams for sharing)
Once you have selected the PowerPoint to present it is very straight forward from that moment.
Using Teams mobile you can also take control of a PowerPoint someone else is presenting (if you are a presenter in the meeting). This means that you can participate in a multi-presenter meeting quite easily by using just your mobile device and Teams!

You will get a warning before you take the control – in case you pressed Take Control accidentally.
Teams mobile: sharing a photo or video
Follow the steps laid out earlier and instead of screen or PowerPoint you select this time a picture (from device’s picture gallery) or a video (using device’s video camera). Since sharing a picture is very straight forward I use the video instead as example.
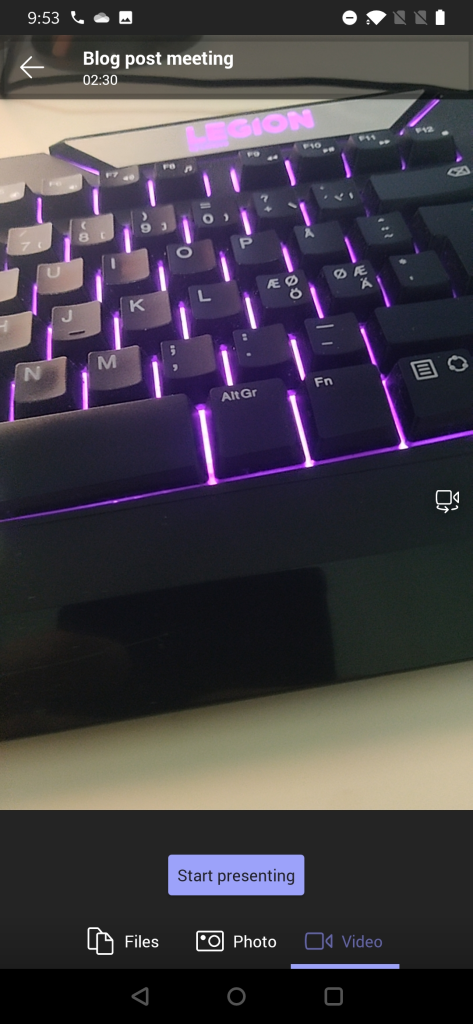
You get to see a preview of video first. You can switch to other camera (front/back usually) & position the device properly and once you are ready you just hit Start presenting .
And when you are done you can press on “Stop presenting” to end your video feed.
This video is different from showing your own video using Camera icon the meeting toolbar. Instead of being a attendee video this one is shown in the shared area for every participant in the meeting. This is useful when you have something in the same room/space that you want to share to others in the meeting. Possible use cases: a model on table, physical whiteboard, view from the window, interviewing someone, view in the outside, …
Best practices from my experience
The way I use to share content when in Microsoft Teams meetings is
- I share one of my screens (I have three screens so this is a natural choice for me). This way I know what is being shared all the time since I always share the same screen (the one in the middle, my camera is on top of that screen). Be careful what you drag to the shared screen. This is the way I share my PowerPoint presentations (projecting the presentation to the shared screen)
- If you have a touch-screen device (like Surface-laptop) you should use pen/inking to enhance the presentation experience. This also works when you are sharing the external screen & presenting from touch-screen device: make your presentation stand out!
- Prepare the content you share in advance. Open PowerPoints, apps, browsers etc so you don’t have to spend any time with them when you are live.
- Share your screen early rather than later. This will give you time to reshare.
- When doing a presentation with multiple persons using just the PowerPoint deck share it directly to Teams meeting so you can switch between speakers easily. With the new Presenter view -support this is now a good option.
- Make use of Teams features: Put everyone but real presenters else as attendee so they can’t start sharing their screen accidentally – and you can hard mute them as well. Use meeting options -setting before they join in.
- When people complain they don’t see the share: check that you are actually sharing your screen. If someone is seeing your share and some others not: those who can’t see your share need to leave and rejoin the meeting. Sometimes restarting your sharing can fix that issue too but usually the issue is in the participant end.
- I rarely use application / window -sharing.
- Sharing a video in Teams meeting (or in Live event) is usually ok but you can expect some quality drop – especially if you have a lower bandwidth. Have a backup link to the video available. People seem to struggle more with videos embedded inside a PowerPoint.
- Use Windows Focus Assist and Teams Do Not Disturb mode so you don’t get any unwanted popups on your shared screen. Microsoft Teams will also have a upcoming feature (currently usable in public preview) that let’s users to choose if Teams notifications do their own “toast” (pop-up banner) or do they go directly to Windows notification area (honoring the Focust Assist setting).
- Use Teams Desktop version + new meeting experience when possible. Check that you have the latest version.
More information or different view into this?
Check out Microsoft Support article about Sharing content in Microsoft Teams meetings .
I hope you have enjoyed this guide and it has provided to be useful. Please do drop a comment from below if you have any questions or you want to send me greetings!
Sharing is Caring! #CommunityRocks
Aiheeseen liittyy.

Published by Vesa Nopanen
Vesa "Vesku" Nopanen, Principal Consultant and Microsoft MVP (M365 and AI Platform) working on Future Work at Sulava. I work, blog and speak about Future Work : AI, Microsoft 365, Copilot, Microsoft Mesh, Metaverse, and other services & platforms in the cloud connecting digital and physical and people together. I have about 30 years of experience in IT business on multiple industries, domains, and roles. View all posts by Vesa Nopanen
5 thoughts on “ The Ultimate How To Guide for Presenting Content in Microsoft Teams ”
- Pingback: Dew Drop – January 18, 2021 (#3361) – Morning Dew by Alvin Ashcraft
- Pingback: [m365weekly] #19 – M365 Weekly Newsletter
- Pingback: PowerPoint Live / Presenter View in Microsoft Teams – Vesa Nopanen – My Teams & Microsoft 365 Day
- Pingback: PowerPoint Live / Presenter View in Microsoft Teams - Tech Daily Chronicle
- Pingback: Microsoft Tech News and Product Updates: 4/26/2021 – Mr. Wombat
Leave a comment Cancel reply
This site uses Akismet to reduce spam. Learn how your comment data is processed .

- Already have a WordPress.com account? Log in now.
- Subscribe Subscribed
- Copy shortlink
- Report this content
- View post in Reader
- Manage subscriptions
- Collapse this bar
How to Share PDF in Microsoft Teams Meeting

In today's digital era, collaboration and remote work have become the norm. Microsoft Teams has emerged as a popular platform that allows teams to connect, collaborate, and share information seamlessly. One crucial aspect of collaboration is the ability to share documents effectively, and in this article, we will explore how to share PDF files in a Microsoft Teams meeting.
Understanding the Basics of Microsoft Teams
Before diving into the specifics of sharing PDFs in Microsoft Teams meetings, let's briefly understand the basics of this powerful collaboration tool. Microsoft Teams is a unified communication and collaboration platform that enables individuals and teams to communicate and collaborate in real-time. It offers features such as instant messaging, audio and video calls, file sharing, and more.
Microsoft Teams is not just a tool for communication; it's a hub for teamwork that brings together people, conversations, and content—along with the tools that teams need—so they can easily collaborate to achieve more. With its integration with other Microsoft 365 apps like Word, Excel, and PowerPoint, Teams provides a comprehensive solution for seamless productivity.
The Importance of Sharing Documents in Teams
Sharing documents is an integral part of any collaboration effort. By sharing PDFs in Microsoft Teams meetings, team members can discuss, review, and make informed decisions together. Whether it's a presentation, a report, or any other document, sharing PDFs in Teams enables a seamless flow of information and enhances productivity.
When team members share PDFs in Microsoft Teams, they not only streamline their workflow but also ensure that everyone is on the same page. This collaborative approach fosters creativity, encourages feedback, and ultimately leads to better outcomes. By leveraging the document-sharing capabilities of Teams, teams can work more efficiently and effectively towards their common goals.
Key Features of Microsoft Teams
Microsoft Teams provides several key features that make it an excellent choice for sharing PDFs during meetings. One such feature is screen sharing, allowing meeting participants to view your PDF directly. Additionally, Teams offers a shared workspace where participants can comment, highlight, and annotate PDFs in real-time, further facilitating efficient collaboration.
Moreover, Microsoft Teams ensures data security and compliance by encrypting data in transit and at rest, providing peace of mind when sharing sensitive information like PDFs. The platform also allows for easy integration with third-party apps, expanding its functionality and customization options to suit the diverse needs of different teams and organizations.
Preparing Your PDF for Sharing
Before jumping into a Microsoft Teams meeting and sharing your PDF, it's essential to ensure that your document is prepared appropriately. This preparation can significantly affect the overall experience for you and your meeting participants.
Sharing a PDF in a virtual meeting requires attention to detail to ensure a seamless presentation. Beyond just clicking "share," taking the time to prepare your PDF can make a notable difference in how effectively your information is conveyed.
Checking Your PDF's Compatibility
Prior to the meeting, it's crucial to verify that your PDF is compatible with Microsoft Teams. Ensure that the PDF file can be opened and viewed by all participants without compatibility issues. If necessary, consider converting your document to a universally supported format, like PDF, to eliminate any potential compatibility hiccups.
Compatibility issues can disrupt the flow of a presentation and lead to valuable time being wasted on troubleshooting. By confirming compatibility in advance, you can avoid technical difficulties and maintain a professional and efficient meeting environment.
Optimizing Your PDF for Viewing
Optimizing your PDF for viewing in Microsoft Teams can enhance the overall experience. Consider optimizing the document for web display, reducing the file size if necessary, and ensuring that the font sizes and formatting are legible. By taking these steps, you can ensure that all participants can clearly view and comprehend the content of the PDF during the meeting.
Optimizing your PDF not only benefits the viewers but also reflects positively on your preparation and attention to detail. A well-optimized document can improve engagement and understanding, making your presentation more impactful and effective.
Steps to Share a PDF in a Teams Meeting
Now that we have covered the groundwork, let's delve into the specific steps to share a PDF in a Microsoft Teams meeting.
Sharing PDF documents during virtual meetings can enhance collaboration and ensure all participants are on the same page. Let's explore the process in more detail to make your presentation seamless and effective.
Starting a Meeting in Microsoft Teams
To begin sharing your PDF, initiate a meeting in Microsoft Teams. This can be done by selecting the scheduled meeting from your calendar or by creating an ad-hoc meeting. Once the meeting has started, you're ready to share your screen or window.
Meetings in Microsoft Teams offer a platform for productive discussions and information sharing. By following these steps, you can engage your audience effectively and deliver your content with clarity.
Sharing Your Screen or Window
With the meeting underway, locate the screen-sharing options within Microsoft Teams. By sharing your screen or window, you can display your PDF document to meeting participants. Ensure that you select the appropriate screen or window that contains the PDF you wish to share.
Screen sharing is a valuable feature that allows you to showcase your content in real-time, fostering collaboration and interaction among meeting attendees. By choosing the right screen or window, you can present your PDF seamlessly and keep your audience engaged throughout the session.
Navigating to Your PDF
Once you have started sharing your screen or window, navigate to the location of your PDF file. It might be on your local drive, a network location, or a cloud storage service like OneDrive. Locate the PDF and open it, allowing all meeting participants to view its contents simultaneously.
Accessing your PDF from various storage locations demonstrates flexibility and preparedness in your presentation. By ensuring all participants can view the document simultaneously, you create a collaborative environment where ideas can be discussed and shared effectively. Make the most of this opportunity to engage your audience and drive meaningful conversations during your Teams meeting.
Troubleshooting Common Issues
Even with the best preparations, occasional challenges can arise when sharing PDFs in Microsoft Teams meetings. Let's explore a couple of common issues and their possible solutions.
When encountering hurdles while sharing PDFs in Microsoft Teams meetings, it's essential to approach troubleshooting with a systematic mindset. By methodically addressing each issue, you can enhance the efficiency of your virtual collaborations and ensure a seamless sharing experience for all participants.
Resolving Sharing Permissions
If participants are unable to view the shared PDF, it's crucial to check the sharing permissions. Ensure that the necessary permissions are granted to all participants, allowing them to view and interact with the document. If issues persist, consider verifying the participant's access rights and adjusting the sharing settings accordingly.
Moreover, fostering open communication within the team can also aid in resolving sharing permission discrepancies. Encouraging participants to voice any difficulties they encounter can lead to swift resolutions and promote a more collaborative environment during Microsoft Teams meetings.
Dealing with Poor Quality or Lag
In some cases, participants may experience poor quality or lag when viewing shared PDFs in Microsoft Teams meetings. To address this, ensure that your internet connection is stable and consider optimizing your PDF for web display, as mentioned earlier. Additionally, closing unnecessary applications and tasks on your computer can alleviate potential performance issues and improve the overall experience.
Furthermore, exploring alternative methods of sharing PDFs, such as utilizing external links or uploading the document to a cloud storage service, can also mitigate issues related to poor quality or lag. By diversifying your sharing techniques, you can adapt to varying technological constraints and ensure a consistent viewing experience for all meeting participants.
Best Practices for Sharing PDFs in Teams
To maximize the effectiveness of sharing PDFs in Microsoft Teams meetings, it's important to follow a few best practices. These practices can enhance accessibility, improve collaboration, and facilitate seamless discussion.
Ensuring Accessibility for All Participants
When sharing PDFs, it's essential to ensure accessibility for all meeting participants. Consider providing alternative text descriptions for images, using clear and concise language, and structuring the document to be screen-reader friendly. By implementing these accessibility practices, you can ensure that every participant can engage with the content and actively participate in discussions.
Managing Participant Interactions with the PDF
During a meeting, participants may have questions or wish to provide feedback on specific sections of the shared PDF. Take advantage of Microsoft Teams' collaboration features and encourage participants to utilize the comment and annotation tools. This allows for efficient feedback collection, easy reference, and fosters a collaborative environment where ideas can be shared and synthesized.
Additionally, it's important to establish clear guidelines for participants when interacting with the PDF. Encourage them to use the highlighting and underlining features to draw attention to important points or to mark areas that require further discussion. By doing so, you can ensure that everyone is on the same page and that the conversation flows smoothly.
Furthermore, consider assigning a designated note-taker during the meeting. This person can summarize key points and action items discussed in the PDF, making it easier for participants to refer back to the meeting's outcomes. This practice promotes accountability and ensures that important details are not overlooked.
Sharing PDFs in Microsoft Teams meetings is a valuable capability that facilitates seamless collaboration and enables teams to work together effectively, regardless of their location. By understanding the basics, preparing your PDFs appropriately, and following the steps outlined in this article, you can leverage Microsoft Teams to share your PDFs with confidence and enhance your team's productivity.
While sharing PDFs in Microsoft Teams can enhance your meeting experience, imagine taking your collaboration to the next level with Bricks. Say goodbye to the hassle of juggling multiple apps and the cost of expensive subscriptions. Bricks offers a comprehensive, AI-powered collaboration platform that integrates team chat, docs, spreadsheets, and presentations—all for free. With Bricks, you can streamline your workflow, embed rich data blocks, and utilize AI assistance to work smarter and faster. Ready to transform the way your team collaborates without spending a dime? Get started for free and build a more efficient future with Bricks.
Explore Bricks
Create and deliver faster with templates. Once signed in, they are fully customizable and easy to edit.

Increase your sales efficiency and track your sales metrics using Bricks.

Travel Plan
Create trip budgets and showcase your experiences using Bricks templates.

Boost your finance team's efficiency and improve your back-office using Bricks.

Unleash your marketing teams creativity and enhance your brand using Bricks.

Jumpstart your career and track your job search using Bricks templates.

SMART Goals
Set your 2024 goals and update your vision board using Bricks templates.
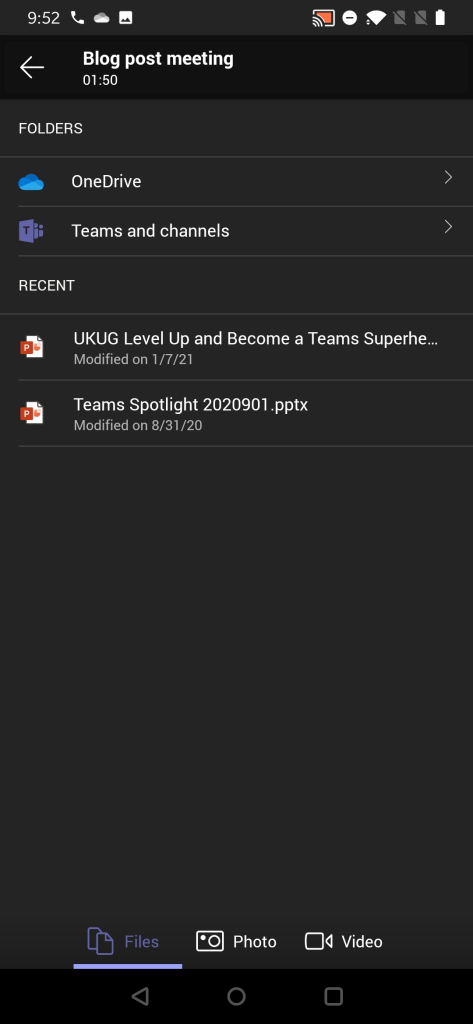
- Explore the Files list
- Edit an Office file
- Download a file
- Move or copy files
- Rename a file
- Collaborate on files
- Sync Teams file libraries to SharePoint
- Delete and recover files
- Print files
- Share files
- Share a file with someone outside your team
- Get a link to a file in Teams
- Share a file from cloud storage
- File storage in Teams
- Add a cloud storage service
- Add third-party apps to the Files app on iOS
- Cloud storage sign-in issues

Collaborate on files in Microsoft Teams
Simplify your workflow with others by collaborating on files in Microsoft Teams. Share them to allow others to view and edit them with you ( editing in Visio requires a license ).
Share a file in Teams
Work on files together by sharing them with members of your team using OneDrive in Teams. To share a file from OneDrive:

Find the file you want to share.

Enter the name, group, or email you want to send your file to.
Add an optional message to give the recipient context.

Your files library in channels
Each channel in Teams has its own file folder where you can share files for that specific channel.
To access channel files:

Select the channel you want to access files in.
Select Files at the top of the channel.
Upload a file
Upload a file to onedrive.
To upload a file to OneDrive in Teams:

Select a file and select Open .
The file will automatically start uploading.
Upload a file to a channel
To upload a file to a channel in Teams:
Choose the channel you want to upload a file in.
Drag and drop the file from where it's currently located into the Teams window among the files.
Select Upload ,then select the file (or files) you'd like to upload, and select Open .
Any files you upload will be accessible by any member of your channel.
Create a file
To create a new file in Teams:
Choose the type of file you want to create.
Enter a name for the file and select Create .
The new file will open for you to start editing.
Note: Linux users won't be able to open files with the desktop Office app.
Collaborate in a file
Collaborate with others in files by uploading and sharing them in Teams.
To share a file and start collaborating with others:
Add the name, group, or email you want to share the file and collaborate with.

Select Can review to allow others to review and suggest changes but not edit directly.
Select Can view to allow others to view the file without making any changes or suggestions.
Select Apply to save changes.
Note: Linux users won't be able to open files with the desktop Office app and will need to use Office for the web.
Related topics
Share files and folders in OneDrive
Document collaboration and co-authoring

Need more help?
Want more options.
Explore subscription benefits, browse training courses, learn how to secure your device, and more.

Microsoft 365 subscription benefits

Microsoft 365 training

Microsoft security

Accessibility center
Communities help you ask and answer questions, give feedback, and hear from experts with rich knowledge.

Ask the Microsoft Community

Microsoft Tech Community

Windows Insiders
Microsoft 365 Insiders
Was this information helpful?
Thank you for your feedback.
- Compress PDF
- PDF Converter
- Chat with PDF
- AI PDF Summarizer
- Translate PDF
- Delete PDF Pages
- Extract PDF Pages
- PDF Annotator
- Number Pages
- Watermark PDF
- PDF to Word
- PDF to Excel
- Word to PDF
- Excel to PDF
- Protect PDF
- Flatten PDF
- PDF Scanner
- How to Convert PDF to PPT
How To Present a PDF Like a PowerPoint

May 2, 2024 by Hung Nguyen
Learn to present a PDF in full-screen mode like you would a PPT file or convert it to PPT for easy presenting.
You can present a PDF as if it were a PowerPoint presentation in two ways. You can either open a PDF and view the content in full screen or save the file as a PowerPoint. If you choose the latter, you can then open the file in Microsoft PowerPoint and present it as you usually would. Check out the full instructions for both methods below.
How To Present a PDF Like a PowerPoint Presentation
Open your pdf document with your pdf reader., click “view” and choose “enter full screen” or “slideshow.”, present as you usually would and navigate using the arrow keys., press the “esc” (escape) key to exit the slideshow when finished..
There are a few limitations to presenting PDF files like this: some media file types, such as animated GIF images, won’t work and will remain static in your presentation. You also can’t add speaker notes to PDF presentations. While we believe PDF is quite versatile, in this case, it might be better to convert the PDF to PPT format using our free converter.
How To Change a PDF to PPT To Present
- Go to the PDF to PPT converter.
- Drag and drop your PDF.
- Wait for the tool to convert it to PPT.
- Click “Download,” and you’re done.

Convert your PDF to PPT format in a heartbeat
Once you have the PPT file open, you can present the data as you would normally. If you have an older version of Microsoft Office, you’ll have to click the “Slide Show” tab and choose “Play from Start” to start a presentation.
While you have a PowerPoint file open, you can also edit the content as you’d like. Optical Character Recognition (OCR) is available within the PDF to PPT tool, where we’ll pluck the content of each PDF into an editable PPT file for your convenience. And while you’re on our blog, check out how to insert a PDF into a PowerPoint — learning new PDF and PPT-related tricks is always good!
We offer the most popular online PDF to PPT converter. A big part of our popularity comes from our simple and intuitive drag-and-drop interface as well as our range of practical tools to convert, edit, sign, protect, and lock PDFs and other documents. Of course, we also offer a tool to reverse this whole process and turn PPT back into PDF.
Easy to Convert and Present
Regardless of the PDF reader, from Adobe Acrobat/Adobe Reader to Preview, or even on your web browser, you should be able to present PDF like a PowerPoint with ease. If you want the extra benefits of presenting using PowerPoint, our tool is free to use, without the need t download software.
We hope this guide could be of help, and good luck with all of your future presentations!

Related articles

How To Insert PDF Into Word
The easiest ways to insert a PDF into a Word document, either as an image or in an editable format, online or offline.

Convert PPT to JPG Online
The best online app to convert PowerPoint slides to JPG images for free. No signup or email is required to use.

AI Article Summarizer – Three Fast & Free Methods
Summarize text, articles, webpages, documents, and PDFs with these simple tools. Get key terms, points, and bullet points in an instant–all for free.
Technology Enhanced Learning Team
Sharing a powerpoint presentation in teams.

For: Staff Application: MS Teams Tagged: Microsoft Teams , web conferencing
To share an online presentation, you can either share your screen with PowerPoint open on your PC or upload your presentation directly into Teams . There are several options for screen sharing and configuring your PowerPoint files when presenting online. You can choose to display your entire desktop or just a specific application on your PC. You can also configure Teams to utilise multiple displays to host a presentation (where multiple monitors are available).
This guide covers:
Share your screen in teams, powerpoint presentations with multiple displays, upload a presentation file into teams.
During a Teams meeting, select the Share Content icon at the top of the window to initiate screen sharing. You will be presented with a window displaying all the available options for sharing. This window will list any displays connected to your device (i.e., Desktop 1, Desktop 2), which will broadcast everything on the selected desktop.
Sharing your entire screen may be the best option if you intend to switch between applications during your presentation. When sharing media, like a video or audio clip, toggle the option to Include computer sound .
Teams will also list options for sharing any specific windows currently open on your PC, allowing you to only broadcast a specific application and hiding the rest of your desktop from view. If you want to only display your presentation file, ensure the PowerPoint presentation is open prior to clicking the Share Screen button .
Upon sharing your screen, the Teams interface will minimise so you can better view your shared content. There will be a small Teams window at the bottom of your screen where you can see the active speaker and use basic meeting controls.
There will also be a bar at the top of the screen allowing you to give control of the presentation to another participant or Stop presenting . If this bar disappears, hover your cursor at the top of your screen and it will unhide. Click the ‘ Pin ’ icon to keep the bar visible at all times.
Please note: If you are sharing your web browser, Teams will broadcast any tab open on your screen to participants. Keep this in mind if you need to access personal information such as your email account.
When delivering a Teams presentation with multiple displays (i.e., two monitors connected to a PC or a laptop with external monitor), you may want to take advantage of the second display to monitor participants. By adjusting your PowerPoint settings to disable ‘Presenter View’ , you can utilise an additional display to open the Chat and Participants windows, or to view participant videos.
To disable Presenter View, open PowerPoint and select the Slide Show tab and then click Set Up Slide Show .

In the options window, under Show type , select Browsed by an individual (window) , and click OK .
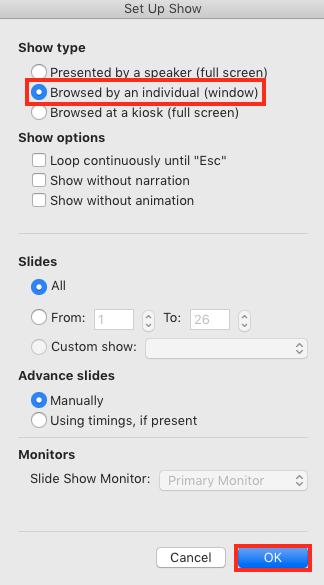
When ready to present, click Play from Start to expand your presentation view. Rather than taking over both displays, your presentation will now display in a window that can be expanded and moved between your screens.
Select Share content in Teams and select your PowerPoint presentation from the list of windows to share . Open the main Teams meeting window after sharing your screen and move it to your second display. You can now monitor the chat and manage participants whilst presenting.
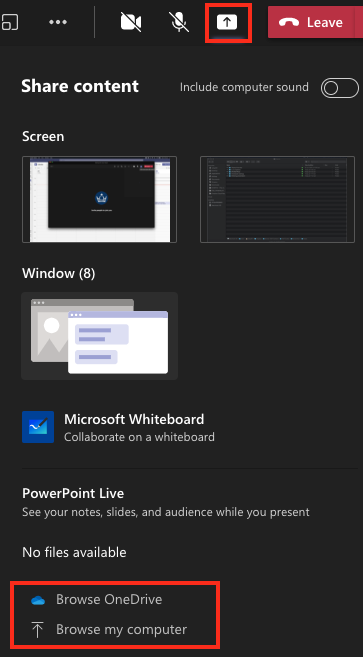
If you do not want to share your PC screen when presenting, you can upload and share a PowerPoint file directly in Teams. This can be advantageous when you do not have a strong internet connection or if you have multiple presenters who will need to control the slides during the session.
Click the Share content icon at the top of the meeting window and select Browse my computer to upload a file (or select Browse OneDrive if your presentation is located in your QMUL Office 365 account).
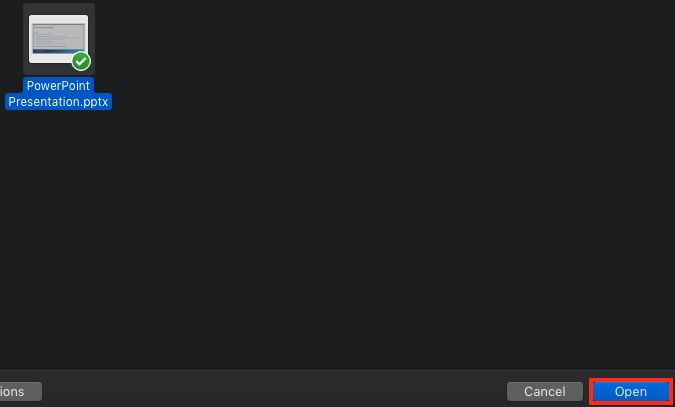
In the file browser , locate the presentation file on your PC and click Open . It may take a few moments for Teams to upload and convert your presentation file.
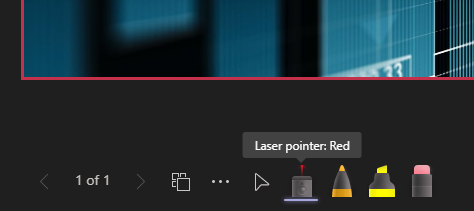
When the presentation has been shared, you will have a set of PowerPoint controls at the bottom of your slides. Use these options to move between slides , open grid view to quickly jump between slides, select a laser pointer , or one of the pen tools to annotate your slides.
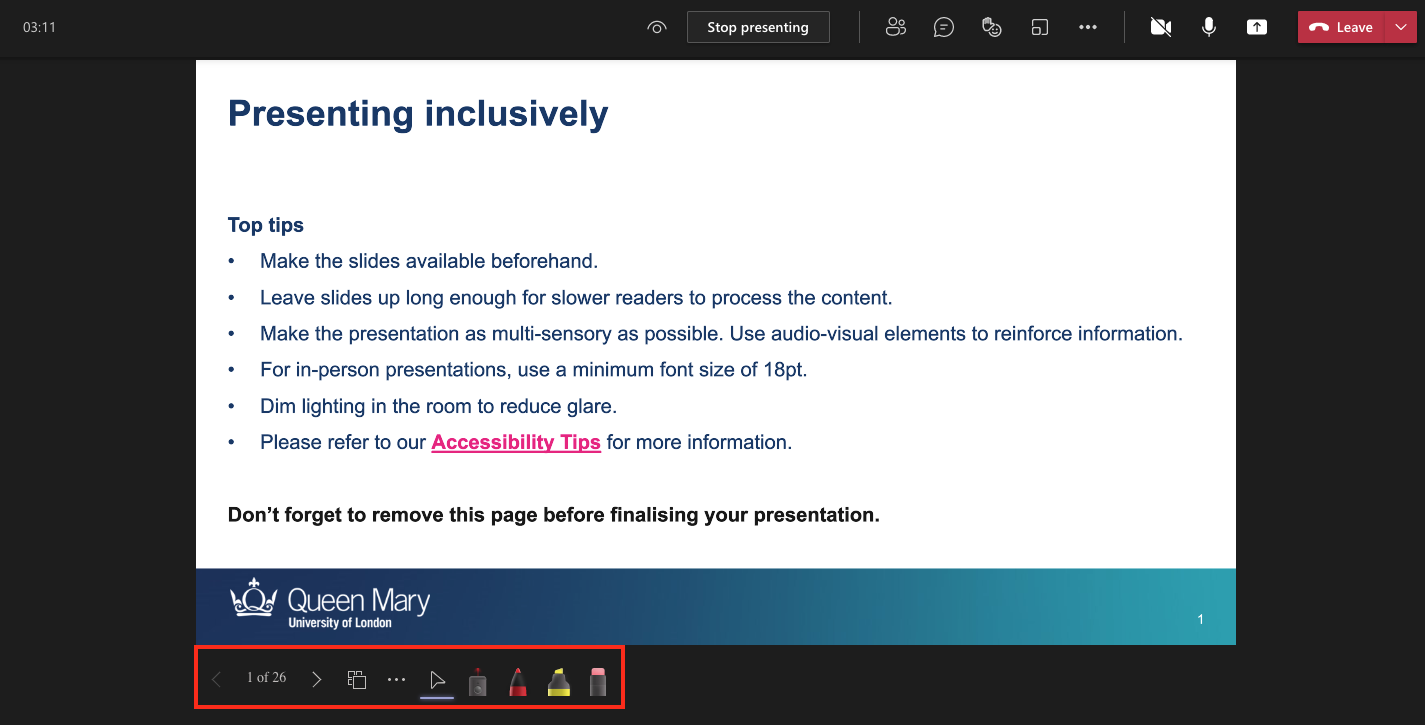
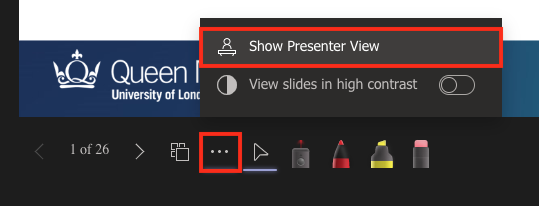
Click the ‘ … ’ More actions icon to switch between single slide and presenter view, or to view the slides in high contrast mode (which may be helpful in certain instances for accessibility purposes).
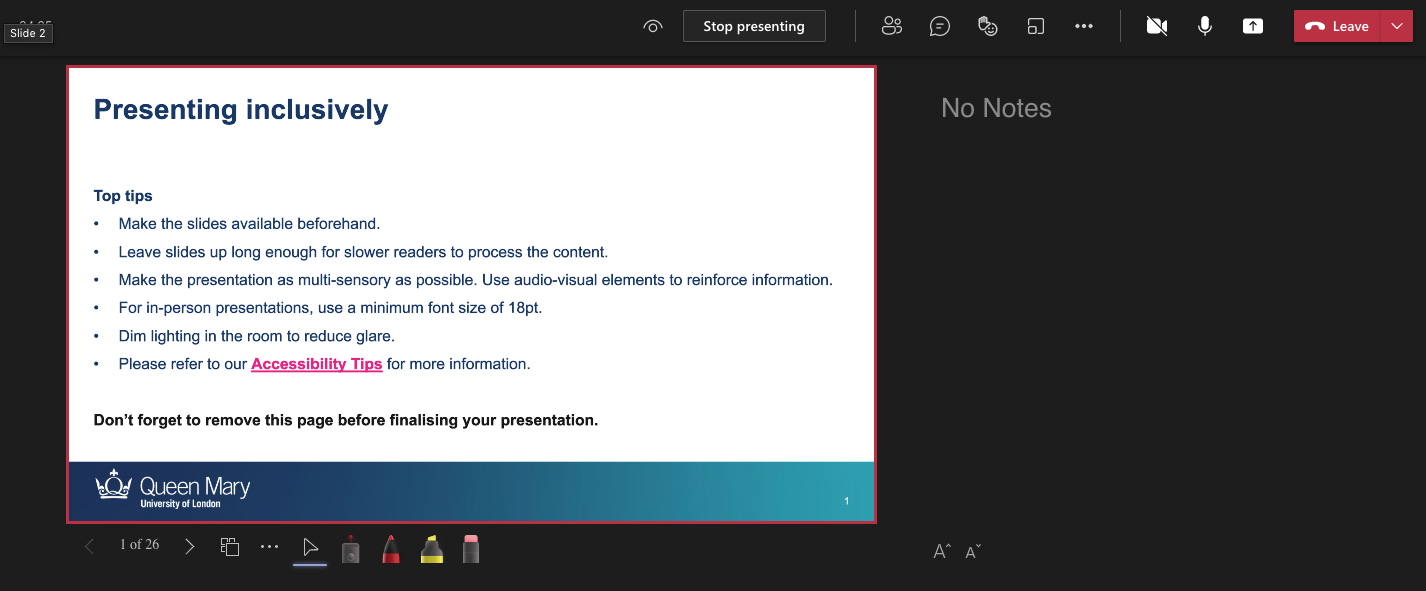
In presenter view, you will see any presenter notes displayed on the right side of your presentation.
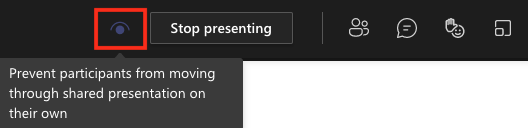
At the top of the window, there is a ‘eye’ icon which you can click to toggle to allow or prevent participants from moving through your shared presentation on their own . Click Stop presenting to end the presentation.
Did this answer your query? If not, you can raise a ticket on the online Helpdesk or email: [email protected] . Alternatively you can also request a particular guide or highlight an error in this guide using our guides request tracker.

Related items
- Automate the creation of Teams for teaching sessions
- Using Mentimeter polling in Microsoft Teams
- Uploading a profile picture in Teams

This browser is no longer supported.
Upgrade to Microsoft Edge to take advantage of the latest features, security updates, and technical support.
Why can't i share my PDFs on Teams?
I recently had a Teams meeting and screen-shared. Everything was going fine until I opened a PDF - it didn't show up in the screens available to share. My browsers, outlook, etc were all available to choose but not the PDF. Does anyone have any ideas?
Seems sharing of PDF’s is not supported so you have to share your screen, which is really not ideal.
@CubanRumLover ,
Could you provide us a screenshot if possible?
Does anyone else have the same issue?

The recommended way to share PDF file is to open the file on system. Then, share the PDF file Window.
If I misunderstand your situation, please give us more information, Thanks for your understanding.
If the response is helpful, please click " Accept Answer " and upvote it.
Note: Please follow the steps in our documentation to enable e-mail notifications if you want to receive the related email notification for this thread.
@CubanRumLover , Do you have any further question on this topic?
@CubanRumLover Haven't received your update for a long time, any update now? If the above suggestion helps, please be free to mark it as answer for helping more people.
Whatever the issue was it seemed to sort itself out a few weeks later. I assume MS had an update but until then i was not able to share any PDFs with anyone, although it was clearly open on my laptop.
Hello @Sharon Zhao-MSFT , I've found this Q and one of my customers has the same issue.
Issue description: She's using a MacBook and cannot share PDF files while using Teams.
What can be done?
I have the same problem with an iMac. I can share a screen, and an Edge browser tab, and the entire screen, but not a window. On my PC I can share the pdf file using the window option.
Practice Assessment Tests
Free assessment tests to get you prepared, how to upload & share pdf files in microsoft teams.

Learn about how to upload and view PDF Files in Microsoft Teams to share important information with your project team.

Key Considerations when using this technology
- Cloud Version
- Mobile Version (IOS, Android)
- Desktop Version
- Web Experience – similar to Desktop
Versions of Microsoft Teams
- Reduce Cluttered Email
- Organize Groups
- Real-Time Collaboration
- Private Chat
- Public Conversation
- Audio/Video Calls
- Virtual Meetings
Benefits of Microsoft Teams
- Communicate with Co-Workers
- Manage Projects
- Manage Resources
- Manage Activities
- Individuals & Groups
Challenges Microsoft Teams Solves
Challenges microsoft teams helps with.
1. Manage Projects 2. Collaborate on Documents 3. Host Meetings 4. Calls and Chats 5. Integrate Business Apps 6. Manage Contacts 7. Store and Share
Microsoft Teams – Central Hub
- Collaborate
- Co-Author work
- Chat and Call
- Virtual Meeting Space
- Integration with Apps
- 1-1 Conversations or in Groups
- Personalize workspace (gifts, stickers, emoji etc.)
Microsoft Teams Features
- Sections Area
- Section Functions
- Stream/Feed Area
Teams User Interface
Microsoft teams concepts, how to organize teams.
1. By Project
- By Department
- By Initiative
Define Channels within Team
- Channel (within Team)
- Break by Topic
- Marketing Campaign
Channel Functions
- More (Add as needed)
Channel -> Posts Functions
- Exchange messages
- Attach Files/Images
- Schedule meetings
- @Mentions to send Push notifications
- Word, Excel, PowerPoint Online
- Multiple Ways to Collaborate
- Conversations
- Version Control
- Auto Save Files
Channel -> Wiki Functions
1. Standards
- Shared Documents
- Methodologies
Microsoft Teams: Peer to Peer Chats
- Host Virtual Online Meetings
- Create a Calendar Event
- Invite others to Join
- Works within and without teams
- Join by Audio Conferencing
Effective Meetings in Microsoft Teams
- Define Objective
- Prepare Agenda
- Capture Decisions
- All Done in Teams
- Use OneNote App
Working with Vendors Using Microsoft Teams
Vendors identified.
Video Creation Vendors
- Mexomon Marketing Group
- Rynaltee Video Creation
- Toriox Advertising Agency
Meeting with Vendors
- Learn about Vendors
- Tell about the project
- Share RFP & Answer Questions
Use Team to Collaborate with Vendors
Create vendor presentation.
- PowerPoint Online
- Conversations
Integrate Microsoft Teams with Asana
Planning & tracking tasks (asana integration).
- Asana Integration
- Tasks Grouping
- Task Assignments
- Task Progress
Asana App Integration with Microsoft Teams
- Create Task
- Link Project
- Notification Settings
How Asana Projects Organized
Watch other tutorials.
Review other relevant tutorials on the topic?
ExxonMobil Employment Assessment Test
Petroleum engineer employment assessment test, how to pass skillcheck pre-employment assessment test: questions with answers & solutions, how to pass revelian cognitive ability assessment test (rcat), how to pass robert half accounting pre-employment assessment skills test: the comprehensive guide, how to take ownership of your career and secure your dream job during the interview, why today’s job market is different, how to pass home depot job interview and pre-employment assessment test: the comprehensive guide, assessment test practice: questions and answers, charts and graphs assessment test: questions and answers.
Below are other relevant resources available on the topic you can consider them to accelerate your learning
[PDF EBook Download] Microsoft Teams Overview: Features, Benefits, Tips and Tricks
Download PDF Ebook to learn about key features and benefits of Microsoft Teams Overview: how to use Microsoft Teams effectively, how to manage projects with Teams, how to effectively collaborate with co-workers and teammates and a lot more.
Free All-in-One Office Suite with PDF Editor
Edit Word, Excel, and PPT for FREE.
Read, edit, and convert PDFs with the powerful PDF toolkit.
Microsoft-like interface, easy to use.
Windows • MacOS • Linux • iOS • Android

- Articles of PPT
How to Share PowerPoint On Teams without Showing Notes
Microsoft Teams help individuals to conduct meetings online and collaborate conveniently. You can also present a PowerPoint presentation with your team using Microsoft Teams. However, many people need to learn how to share PowerPoint on Teams.
Do you want to share PowerPoint presentations on Teams without showing Notes? This article will help you to learn how to share PowerPoint on Teams without showing notes. Stay with us.
Part 1. How To Share PowerPoint on Teams Without Showing Notes?
You can easily share your PowerPoint on Teams in simple steps. You can share the PowerPoint in Slide View, Presenter View, or PowerPoint Live. Let's discuss each method in detail.
Method 1. Share the PowerPoint Slide View
This is the most straightforward method to share PowerPoint on Teams. Follow these steps to share your presentation on Teams.
Step 1: Open your presentation in PowerPoint that you want to share.
Step 2: Connect with your team using Teams or start a new meeting.
Step 3: Go to the Share option in Microsoft Teams.
Step 4: Select the Window option.
Step 5: Choose the PowerPoint presentation window to share and click the Share button.
Step 6: Go to the PowerPoint again and select the Slide Show option or press the F5 key to present the presentation in full screen.
Using this option, you can present your presentation in full screen on Teams. Your team members will not see the notes. However, the notes will be hidden from you also. Also, you won't be able to see Team controls.
Method 2: Using The Presenter View
If you have two screens, you can use the Presenter view option to share your presentation on Teams. Follow these steps to use this method.
Step 1: Open your presentation in PowerPoint.
Step 2: Select the Slide Show option in PowerPoint or press the F5 key.
Step 3: Select Use Presenter View in the monitor section.
Step 4: Press F5 or select Slide Show again from PowerPoint.
Step 5: Access your Teams meeting from Teams or Calendar or start a New Meeting.
Step 6: Select Screen Share from the Teams sharing tray and then select the monitor you are using.
Step 7: Click the Share button to share your presentation on Teams.
This method allows you to see the notes with each slide while sharing the presentation. However, you can not see different options and tools of Teams and can not interact with your team members.
Method 3. Using PowerPoint Live
PowerPoint Live allows you to present your presentation directly from within the Teams. It gives the Presenter and the audience a unique and engaging experience. You can share your presentation using PowerPoint Live using these steps.
Step 1: If you are in a Teams meeting, select Share and select the PowerPoint presentation in the PowerPoint Live option. If you cannot see your required presentation, browse for your desired presentation in OneDrive or My PC.
Step 2: If your presentation is already opened in PowerPoint, Go to the File menu and select Share, and then click the Present Online option.
Step 3: If you are using PowerPoint for the web, select Present and then select Present in Teams.
Using PowerPoint Live helps you to access all the options and tools of Teams. You can easily engage with your audience using different opinions available. You can turn Chat on or off and see raised hands by the audience in real-time. You can also customize other Layout options for your presentation.
Part 2: Free Alternative Choice-WPS Office
WPS Office is the best office solution in the modern world. It is a powerful office productivity suite used by millions nowadays. Professionals and students use WPS Office to create impressive documents, analytical spreadsheets, stunning presentations, etc. WPS Office is an all-in-one productivity suite that contains the following applications and tools.
Writer - to create Word documents, CVs, resumes, and much more
Spreadsheet - to create Excel sheets used for data analysis and insights
Presentation - used to create impressive PowerPoint presentations
AirPage - online document collaboration tool
PDF - to create, edit, and open PDF documents
Besides these, WPS Office also has Teams, WPS Cloud, document conversion tools, and many more practical applications.
Amazing and Unique Features of WPS Office
WPS Office has powerful and unique features and functions, making it the best alternative to Microsoft Office, Libre Office, and other office suites. Some of the special and modern features and functions of WPS Office are listed below.
Free To Use
The most in-demand and unique feature of WPS Office is its free availability for all platforms. Users can use WPS Office on Windows, Mac, Linux, Android, and iOS devices free of cost.
Templates Library
WPS Office has a vast collection of attractive templates in its applications. You can use these built-in templates to design a CV, resume, presentation, etc. There is no need to create your documents from scratch. You can use any of the suitable templates and create your documents easily.
WPS Productivity Tools
WPS also contains many helpful productivity tools included in the Office suite. You can easily convert between different document formats. There is no need to use third-party conversion tools. You can also insert or remove watermarks from your document. There is a Screen Recorder in WPS Office, which helps you to record screens, record a particular window, or record using the Webcam of your PC.
Use Word, Excel, and PPT for FREE, No Ads.
Edit PDF files with the powerful PDF toolkit.
Microsoft-like interface. Easy to learn. 100% Compatibility.
Boost your productivity with WPS's abundant free Word, Excel, PPT, and CV templates.
WPS Academy
WPS Academy offers free easy to understand office tutorials. It provides free video tutorials regarding different features and functions of WPS Office and how to use them. These tutorials help you to master your skills in Excel, PowerPoint, Writer, and PDF applications.
Picture To PDF
This tool helps you to convert your images to PDFs. You can take pictures of the documents and then can generate PDF documents quickly. This feature lets you scan an entire book and make a PDF from all the scanned photos.
Auto Backup Feature
WPS Office also offers an Auto Backup feature. This feature helps you to create a local backup of all your documents. You can create your Word, PowerPoint, Excel, and document backups. You can also save this backup to WPS Cloud.
You can create a team of all your teammates using WPS Team. WPS Teams help you to interact with your colleagues easily. You can share your files. You can also track changes and see all files' version history.
How to Download WPS Office?
You can easily download WPS Office from its official website. Go to the website and click the Free Download option. After the download, run the installer file, and WPS Office will be installed on your PC.
Frequently Asked Questions
1. how to share powerpoint presentations on teams without displaying speaker notes.
You will need two screens to use the Presenter view to show the presentation without showing notes.
2. How do I change the Presenter mode in PowerPoint?
Go to the Slide Show option from the main menu in PowerPoint and check the Presenter View checkbox to use the presenter mode in PowerPoint.
How To Share PowerPoint On Teams Without Showing Notes - Wrap Up
You can easily share your PowerPoint presentation on Teams. You can use the Slide Show option or use the Presenter View to share your PowerPoint presentation. You can also use the PowerPoint Live option to share your PPT on Teams. This article provided you with a detailed tutorial on how to share PowerPoint on Teams without showing notes.
WPS Office is also a powerful solution that lets you share your PowerPoint presentation on WPS Teams in simple and easy steps. You can download WPS Office for free from its official website.
- 1. How to Share PowerPoint on Teams: A Step-by-Step Guide
- 2. How to Share PowerPoint Without Showing Notes (Step-By-Step)
- 3. How to Use Microsoft Copilot in Teams (Step-by-Step)
- 4. How to Use Teams Presenter Mode for PowerPoint Presentations
- 5. How to Share PowerPoint on Zoom Without Showing Notes (In Easy Methods)
- 6. Zoom: Sharing PowerPoint without Showing Notes On Mac

15 years of office industry experience, tech lover and copywriter. Follow me for product reviews, comparisons, and recommendations for new apps and software.
Office is now Microsoft 365
The all-new Microsoft 365 lets you create, share and collaborate all in one place with your favorite apps

For Organizations
For educators, free or premium: microsoft 365 has you covered.
Everyone gets cloud storage and essential Microsoft 365 apps on the web, free of charge

Create something inspiring
Quickly design anything for you and your family—birthday cards, school flyers, budgets, social posts, videos, and more—no graphic design experience needed.

Store with confidence
Your files and memories stay safe and secure in the cloud, with 5 GB for free and 1 TB+ if you go premium

Share with friends...
...even if they don't have Microsoft 365. Seamlessly collaborate and create files with your friends and family

Protect your personal data
Easily add and monitor your family members' information in your dashboard

More apps in fewer places
The new Microsoft 365 brings together your favorite Microsoft apps all in one, intuitive platform

The best tools. Your best team. The world at your fingertips.
Microsoft 365 empowers your employees to do their best work from anywhere in the world, together in one place

Create anywhere, anytime, with any app
Anyone in your organization can quickly create documents, presentations, and worksheets within a single, unified, Microsoft 365 experience

Your content Your Microsoft 365
Microsoft 365 empowers your organization to organize, and safely store files in OneDrive with intuitive and easy organizational tools

Work together, better
Keep your business connected from anywhere with chat and cloud collaboration tools

Pick up where you left off
Microsoft 365 seamlessly tracks updates, task, and comments across all your files so you can pick up right where you left off

Empower your students and teachers to achieve more
Teachers and students get access to the best tools for learning anywhere—in the classroom, remotely or in a blended environment—for free

Spark creativity and collaboration in any learning environment—whether in the classroom, remote, or blended—with intuitive, inclusive design

Empower your educators
Create equitable learning environments that help students develop knowledge and skills essential for both academic and career success

Learning reimagined
Give students the tools to learn and collaborate on projects together and independently, all in one place

Bring your class together
Microsoft 365 helps your students connect and achieve more together, whether in the classroom, at home, or around the globe

Get the free Microsoft 365 mobile app

Follow Microsoft 365

- Press Release
August 14, 2024
Bma to open latoya ruby frazier’s acclaimed installation more than conquerors in november 2024.

This is the first time the artwork celebrating Baltimore’s Community Health Workers will be shown in the community that inspired it
BALTIMORE, MD (August 14, 2024)—The Baltimore Museum of Art (BMA) announced today the November opening of LaToya Ruby Frazier’s acclaimed installation More Than Conquerors: A Monument for Community Health Workers of Baltimore, Maryland 2021-2022. Featuring a series of portraits and related narratives mounted on 18 socially distanced, stainless-steel IV poles, the large-scale installation captures and celebrates the essential work of community health workers in Baltimore during the rollout of the COVID-19 vaccine. Powerful and evocative, the installation monumentalizes the Community Health Workers’ efforts and offers an alternative approach to monument-making that challenges us to consider the nature of how and who we honor. The work was originally commissioned for the 58th Carnegie International, where it won the Carnegie Prize.
The BMA acquired More Than Conquerors: A Monument for Community Health Workers of Baltimore, Maryland 2021-2022 in spring 2023, with the generous support of the Glenstone Museum, and its forthcoming presentation marks the first time that it will go on view at the museum and in Baltimore. Open from November 3, 2024 through March 23, 2025, the installation is part of Turn Again to the Earth , a series of initiatives unfolding at the BMA focused on modeling commitments to sustainability and fostering dialogue about environmental issues. Turn Again to the Earth includes 10 exhibitions, the development of the BMA’s sustainability plan, and a Baltimore city-wide eco-challenge.
“We are thrilled to launch the exhibition portion of Turn Again to the Earth with the presentation of LaToya Ruby Frazier’s compelling and deeply resonant installation More Than Conquerors . The presentation is a singular opportunity to honor some of Baltimore’s most important and under-sung heroes in our museum and to consider the complex relationships between environment, health, and social inequities,” said Asma Naeem, the BMA’s Wagner Wallis Director. “We look forward to engaging our audiences with LaToya’s incredible artistry, to celebrating the everyday stories in our community, and to spurring conversations about timely issues that impact our lives.”
More Than Conquerors is an outgrowth of Frazier’s long-standing relationship with Dr. Lisa Cooper, Bloomberg Distinguished Professor at Johns Hopkins University School of Medicine and Bloomberg School of Public Health and Director of the Johns Hopkins Center for Health Equity. The two first connected during a 2015 conversation hosted by The Contemporary and the Baltimore School for the Arts that explored the power of art, science, and medicine to address environmental racism. Frazier was awarded a commission for the 58th Carnegie International during the pandemic and when she experienced an incident of medical injustice while trying to obtain a COVID-19 vaccination, she became inspired to develop a project that both revealed the depth of healthcare inequity and celebrated those individuals on the frontlines working for change.
Since the 1970s, Community Health Workers (CHWs) have served as an essential resource to underserved communities, helping individuals overcome challenges to healthcare access and providing advocacy in discussions with those working in healthcare systems and state health departments. CHWs played a critical part in the rollout of the COVID-19 vaccine, sharing information, encouraging acceptance of the treatment, and providing access and support. Despite their importance within communities in Baltimore and cities across the country, CHWs were among the unsung heroes of the pandemic and their daily efforts were necessary to ensure medical justice and healthcare equity. With the support of practitioners and educators at Johns Hopkins University as well as other healthcare advocates, Frazier connected with Tiffany Scott, co-founder and Chair of the Maryland Community Health Worker Association, and a group of CHWs actively involved in vaccination efforts between 2020 and 2021. More Than Conquerors reveals their portraits, stories, and voices, creating a poignant monument to their tireless efforts and recognizing their invaluable contributions to the lives of countless people and the health of many communities.
Collaborators
Community Health Workers: La Kerry B. Dawson, Tracy Barnes-Malone, Karen Dunston, Kenya Ferguson, Griselda Funn, Erica Hamlett, Donnie Missouri, Veda Moore, Kendra N. Lindsey, Evelyn Nicholson, Helen Owhonda, Gregory Rogers, Wilfredo Torriente, and Latish Walker.
Dr. Lisa Cooper; Dr. Chidinma Ibe, Nico Dominguez Carrero, and Alison Trainor of the Johns Hopkins Center for Health Equity; Dr. Anika L. Hines of the Johns Hopkins Center for Health Equity and Virginia Commonwealth University; Mrs. Tiffany Scott, co-founder and Chair of the Maryland Community Health Worker Association; and Reverend Debra Hickman, President and CEO of Sisters Together and Reaching, Inc. (STAR) and co-chair of the Johns Hopkins Center for Health Equity’s Community Advisory Board.
LaToya Ruby Frazier
LaToya Ruby Frazier’s (b. 1982, Braddock, PA) practice engages with social justice movements, cultural change, and the American experience through a wide range of media, including photography, video, performance, installation, and books. She often uses collaborative storytelling that captures the voices and stories of individuals represented in her artworks. Her prior projects have addressed topics of industrialism, rust belt revitalization, environmental justice, access to healthcare, access to clean water, workers’ rights, the nature of family, and communal history. Her work has been the subject of numerous solo exhibitions at institutions across the U.S. and Europe and her work is held in many public art collections. In May 2024, the Museum of Modern Art in New York opened the first museum survey dedicated to her work, titled LaToya Ruby Frazier: Monuments of Solidarity . In 2024, TIME named her among the 100 most influential people of the year. Other recent accolades include the 2020–21 National Geographic Storytelling Fellowship and a commission for the Carnegie Museum 58th Carnegie International.
Turn Again to the Earth
Turn Again to the Earth refers to a series of major initiatives at the BMA that model commitments to environmental sustainability and foster discourse on climate change and the role of the museum. Unfolding over the remainder of 2024 and throughout 2025, the interrelated efforts include an evaluation of internal BMA practices for environmental impacts and the creation of a sustainability plan for the museum; a series of exhibitions and public programs that capture the relationships between art and the environment across time and geography; and a citywide eco-challenge that invites Baltimore and regional partners to engage in environment-related conversations and enact their own plans for a more sustainable future. Following months of climate-driven protests at museums across the U.S. and abroad, the BMA’s environmental initiatives offer opportunities for more productive dialogues and actions within the museum context. As the museum celebrates its 110th anniversary, it is fitting that it considers its future in part through the lens of this critical subject. The title for the series of initiatives is inspired by the writing of environmental activist Rachel Carson, who spent most of her life in Maryland.
About the Baltimore Museum of Art
Founded in 1914, the Baltimore Museum of Art (BMA) inspires people of all ages and backgrounds through exhibitions, programs, and collections that tell an expansive story of art—challenging long-held narratives and embracing new voices. Our outstanding collection of more than 97,000 objects spans many eras and cultures and includes the world’s largest public holding of works by Henri Matisse; one of the nation’s finest collections of prints, drawings, and photographs; and a rapidly growing number of works by contemporary artists of diverse backgrounds. The museum is also distinguished by a neoclassical building designed by American architect John Russell Pope and two beautifully landscaped gardens featuring an array of modern and contemporary sculpture. The BMA is located three miles north of the Inner Harbor, adjacent to the main campus of Johns Hopkins University, and has a community branch at Lexington Market. General admission is free so that everyone can enjoy the power of art.
Press Contacts
Anne Brown Baltimore Museum of Art Senior Director of Communications [email protected] 410-274-9907
Sarah Pedroni Baltimore Museum of Art Communications Manager [email protected] 410-428-4668
Alina Sumajin PAVE Communications [email protected] 646-369-2050
IMAGES
COMMENTS
Present content in Microsoft Teams meetings When working remotely in Microsoft Teams, you can present content by sharing your screen, your entire desktop, a PowerPoint file, and more.
Based on my knowledge, when you share screen in the meeting and click the browse, you can only upload PowerPoint File in the meeting and it is not support other format of files. If you want to share PDF files to your student, you'd better share files in the Teams channel and invite your student to your Teams channel.
Discover more ways to share content in Microsoft Teams. Jen Bradley from the #MicrosoftTeams team talks about some of her favorite ways to share content in a meeting.
Shared documents in Microsoft Teams meetings are essential for effective communication and collaboration. Everyone can have the same understanding of topics discussed, avoiding any confusion. Presentations, reports, or any other document relevant to the meeting can be shared to ensure everyone is on the same page.
Learn about how to upload and view PDF Files in Microsoft Teams to share important information with your project team. SUBSCRIBE!!! https://www.howtoanalyzed...
Share slides in Microsoft Teams meetings with PowerPoint Live PowerPoint Live in Teams gives both the presenter and audience an inclusive and engaging experience, combining the best parts of presenting in PowerPoint with the connection and collaboration of a Microsoft Teams meeting.
Sharing / presenting content in Teams meeting is at the same time simple but is also has some options available that may not be known enough by everyone. This guide lets you get started and dive deeper what happens when you share your window, document or desktop in Microsoft Teams.
Sharing PDF PowerPoint and more in a Teams Meeting on a MacA few subscribers that use Apple systems were asking how to share PDF's, PowerPoints and more usin...
Learn how to easily share PDF files during Microsoft Teams meetings with this comprehensive guide.
Share a file in Teams Work on files together by sharing them with members of your team using OneDrive in Teams. To share a file from OneDrive: In Teams, go to OneDrive > My Files. Find the file you want to share. Hover over the file and select Share . Enter the name, group, or email you want to send your file to. Add an optional message to give the recipient context. Select Sharing settings to ...
The screen share tab in the Teams call never gives the option of sharing the pdf window. It shows other windows and desktop, but never Adobe PDF as its own share option.
Share screen and PDF's How does one share a PDF when screen sharing a power point presentation in Teams. The PDF was linked to a picture in the Power Point. It worked when not in Teams, but failed when screen shared in Teams.
How to either present a PDF in full-screen mode like you would with a PPT file, or convert it to PPT for easy presenting.
Sharing PowerPoint slides in Teams? Here are your options with videos of what you and the audience see. Includes Presenter View and video beside slides options.
Adobe Acrobat for Microsoft Teams offers a comprehensive suite of PDF tools, streamlining PDF operations. This integrated PDF solution enables you to: Use Adobe's advanced web-based viewer for opening and viewing PDFs online. Use the AI Assistant feature to help you quickly and easily understand complex PDF documents. It can also help you summarize and get insights from your MS Teams meeting ...
Sharing a PowerPoint presentation in Teams For: Staff Application: MS Teams Tagged: Microsoft Teams , web conferencing To share an online presentation, you can either share your screen with PowerPoint open on your PC or upload your presentation directly into Teams.
When sharing a PDF using Adobe Acrobat Reader during a teams meeting, switching the PDF to Full Screen mode results in a blank screen for attendees. If we stop the share and share the same document again (while it is in Full Screen mode), it will work.
I recently had a Teams meeting and screen-shared. Everything was going fine until I opened a PDF - it didn't show up in the screens available to share. My browsers, outlook, etc were all available to choose but not the PDF. Does anyone have any ideas?
If you're leading a presentation and need to share your PowerPoint slides during a Microsoft Teams meeting, here's how: • Once your meeting is active, select "Share." Then choose the ...
Learn about how to upload and view PDF Files in Microsoft Teams to share important information with your project team. Overview […]
I want to share the PDF file in Teams like sharing an image because there are clickable links in the PDF file. You can share a PDF file in Teams by clicking Choose file beneath the compose box in a chat or channel conversation. However, it seems that currently, you cannot click on the hyperlinks within a PDF while the document is opened in ...
Microsoft Teams help individuals to conduct meetings online and collaborate conveniently. You can also present a PowerPoint presentation with your team using Microsoft Teams. However, many people need to learn how to share PowerPoint on Teams.
If you need to present in an online meeting, you can show your PowerPoint slides right from a Microsoft Teams meeting.If you're a presenter:1. Select Share c...
Collaborate for free with online versions of Microsoft Word, PowerPoint, Excel, and OneNote. Save documents, workbooks, and presentations online, in OneDrive. Share them with others and work together at the same time.
This is the first time the artwork celebrating Baltimore's Community Health Workers will be shown in the community that inspired it. BALTIMORE, MD (August 14, 2024)—The Baltimore Museum of Art (BMA) announced today the November opening of LaToya Ruby Frazier's acclaimed installation More Than Conquerors: A Monument for Community Health Workers of Baltimore, Maryland 2021-2022.